Quick start: Chat SDK for Android
A quick start guide that shows you how to implement and launch the Kustomer Chat SDK in a sample Android app.
We'd love to get your feedback!
We want our docs to be clear, accurate, and usable. Create and log in to your ReadMe account to suggest edits, ask questions, and provide feedback.
This quick start guide provides step-by-step instructions on how to implement the Kustomer Chat SDK and launch the chat widget for your Kustomer organization in a basic Android app.
We'll work with a sample app template and the emulator available in Android Studio.
Goals
By the end of this tutorial, you'll know how to:
- Create a basic Android app to run in the Android Studio emulator
- Add the Kustomer Chat SDK as an app dependency
- Configure the Kustomer Chat SDK in a new Application class
- Launch the Kustomer Chat SDK in a sample Android app
Prerequisites
Before you get started, make sure you have the following:
- Android Studio to create a sample app and run the app in the emulator
- A valid API Key that includes the
org.trackingrole for your Kustomer organization. To learn more, see Requirements. - Admin access to your Kustomer organization
Android app development experience is helpful but not necessary for completing this tutorial.
Resources for Android app development
While you'll create a basic Android app for this tutorial, this quick start guide does not provide in-depth instructions for Android app development.
For a comprehensive introduction to Android app development, visit Build your first app on the Android developer portal.
Android Studio Emulator functionality for Apple Silicon M1
To use the Android Studio emulator with an Apple Silicon M1 computer, visit Android Emulator Silicon Preview in the Android Studio developer documentation.
Step 1: Create a new project in Android Studio
First, create a new project in Android Studio. We'll use a project template to create an Android app that runs in the Android Studio emulator. The sample app contains a few pre-configured screens and buttons.
Step 1.1
To create a new project in Android Studio, go to File and select New > New Project to open the Select a Project Template screen.
If you're on the Welcome to Android Studio screen, select + Create New Project.
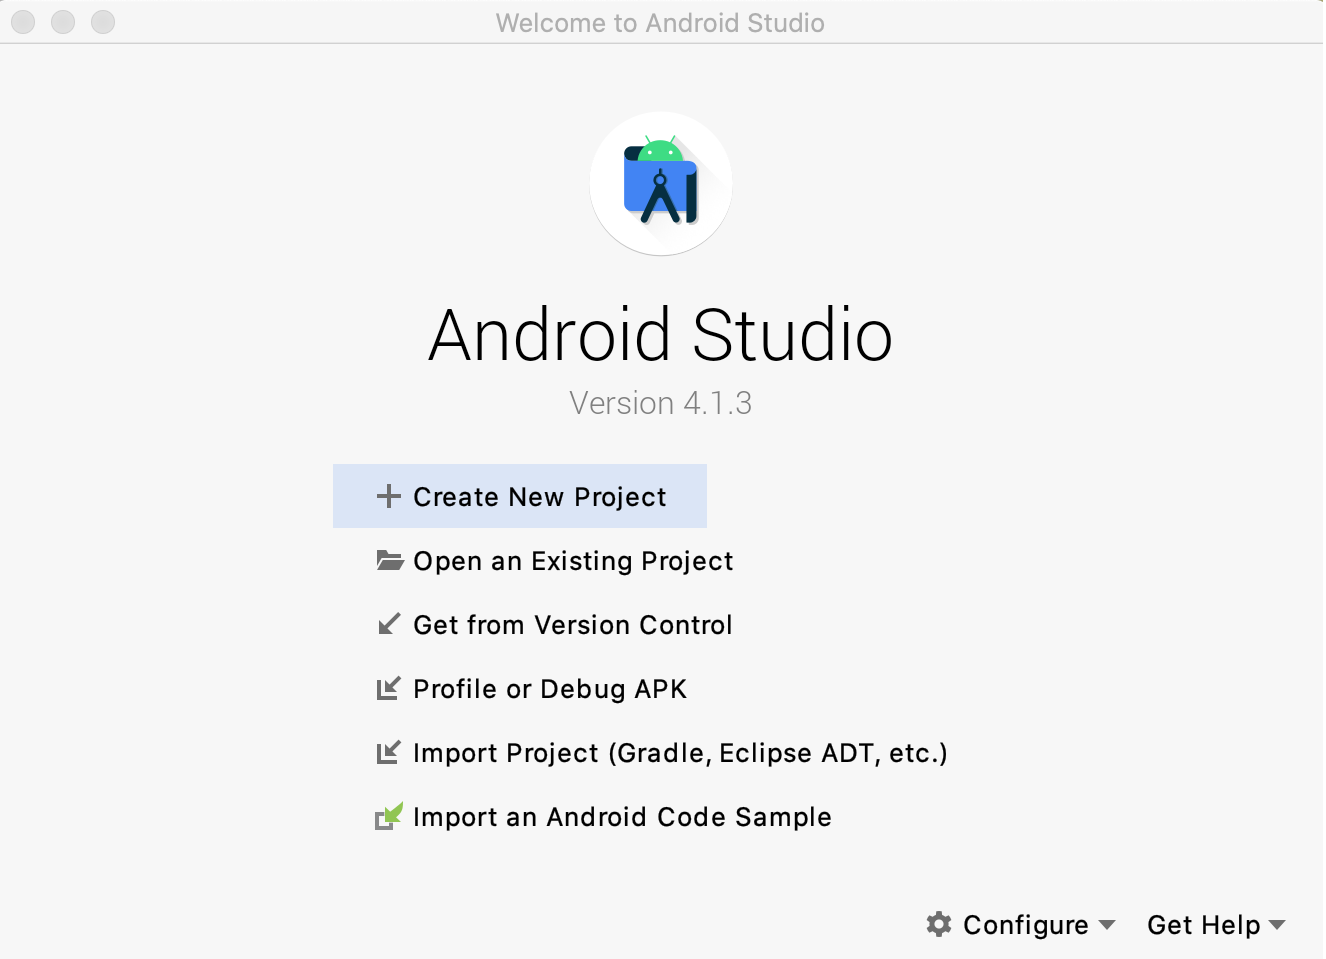
If you're on the Welcome to Android Studio screen, select + Create New Project.
Step 1.2
On the Select a Project Template screen, choose Basic Activity from the Phone and Tablet section. Select Next to open the Configure Your Project screen.
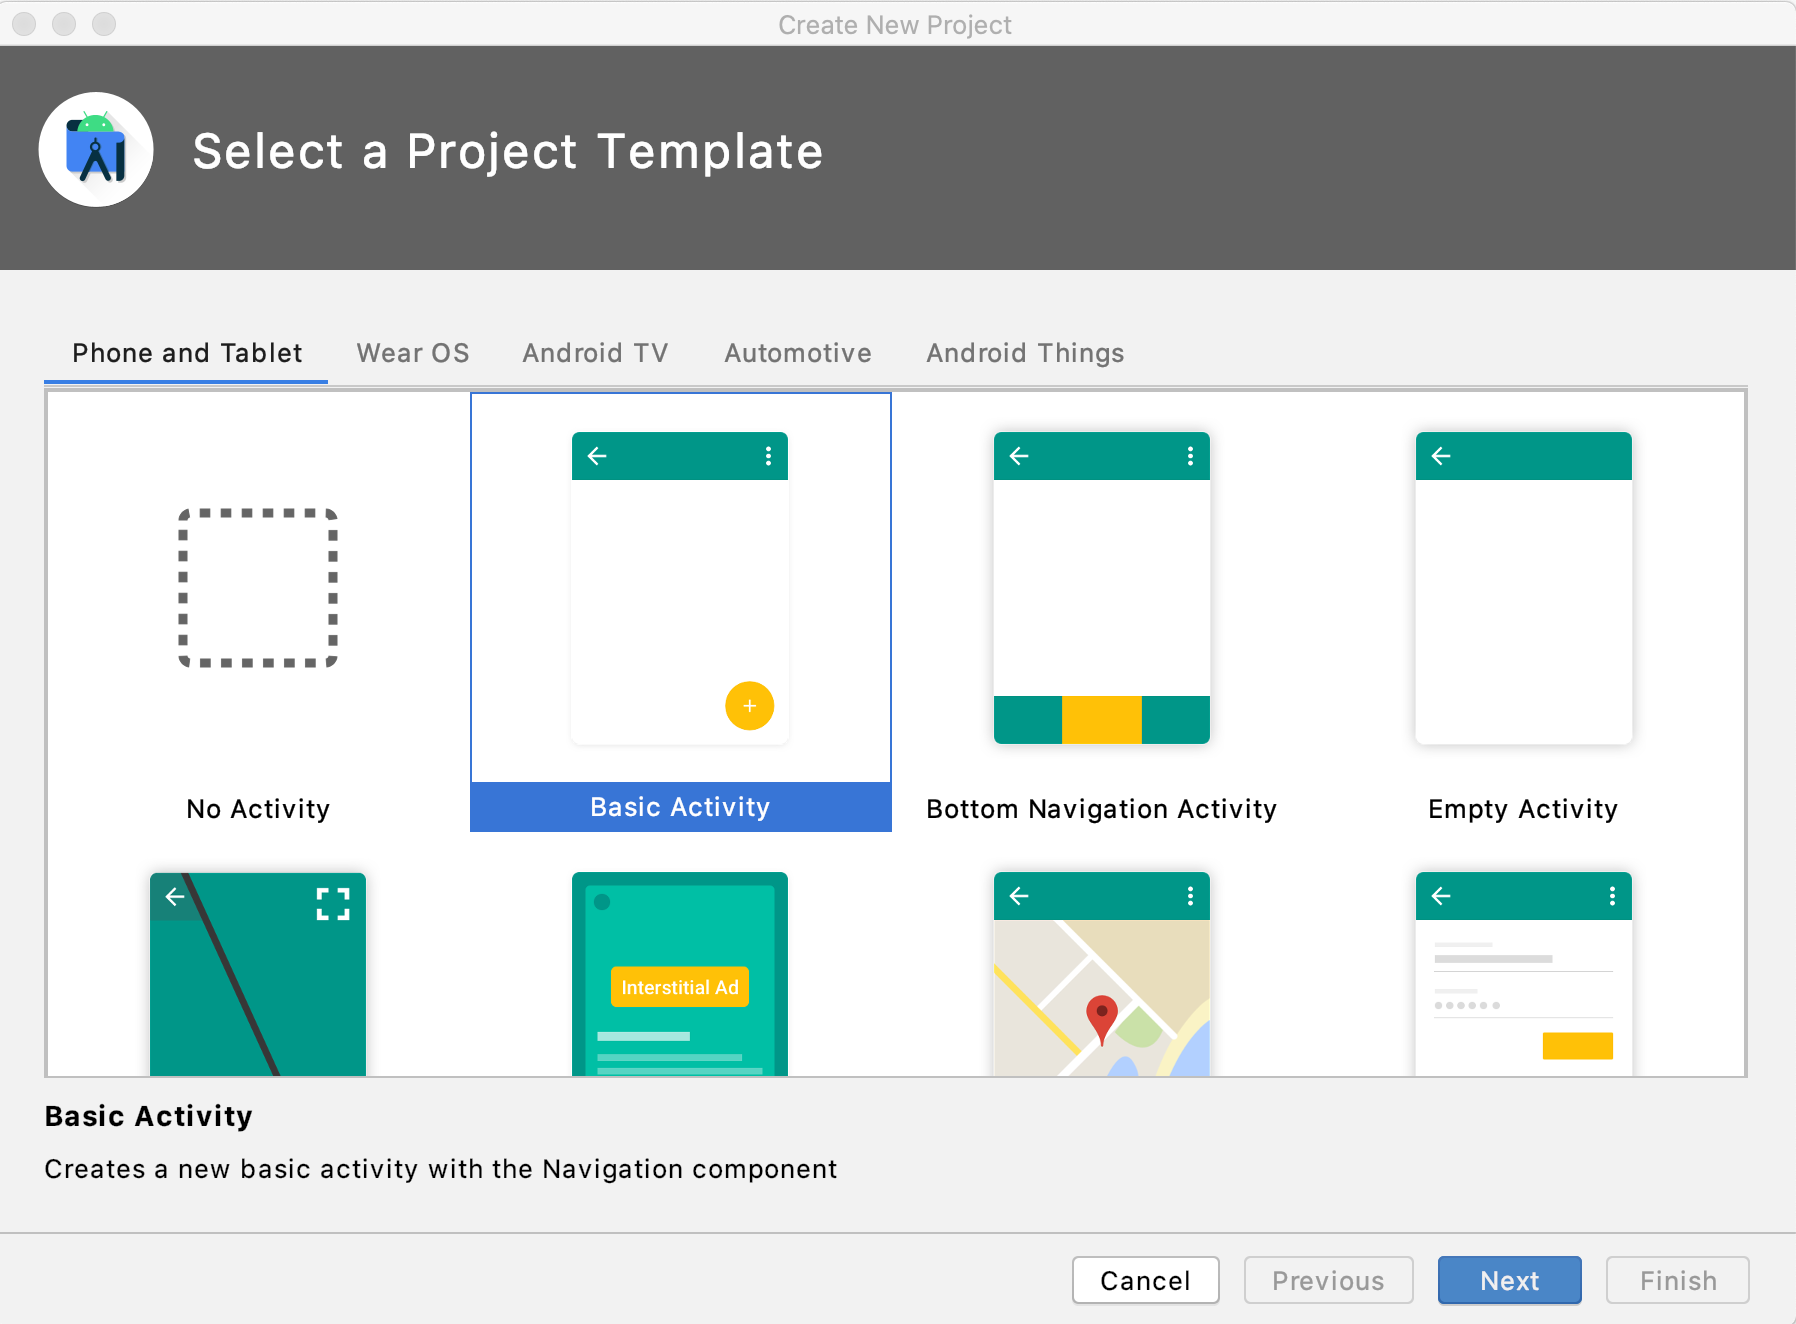
Choose Basic Activity from the Phone and Tablet section.
The Configure Your Project screen displays pre-configured default values. Set the minimum Android SDK version to the API 21.
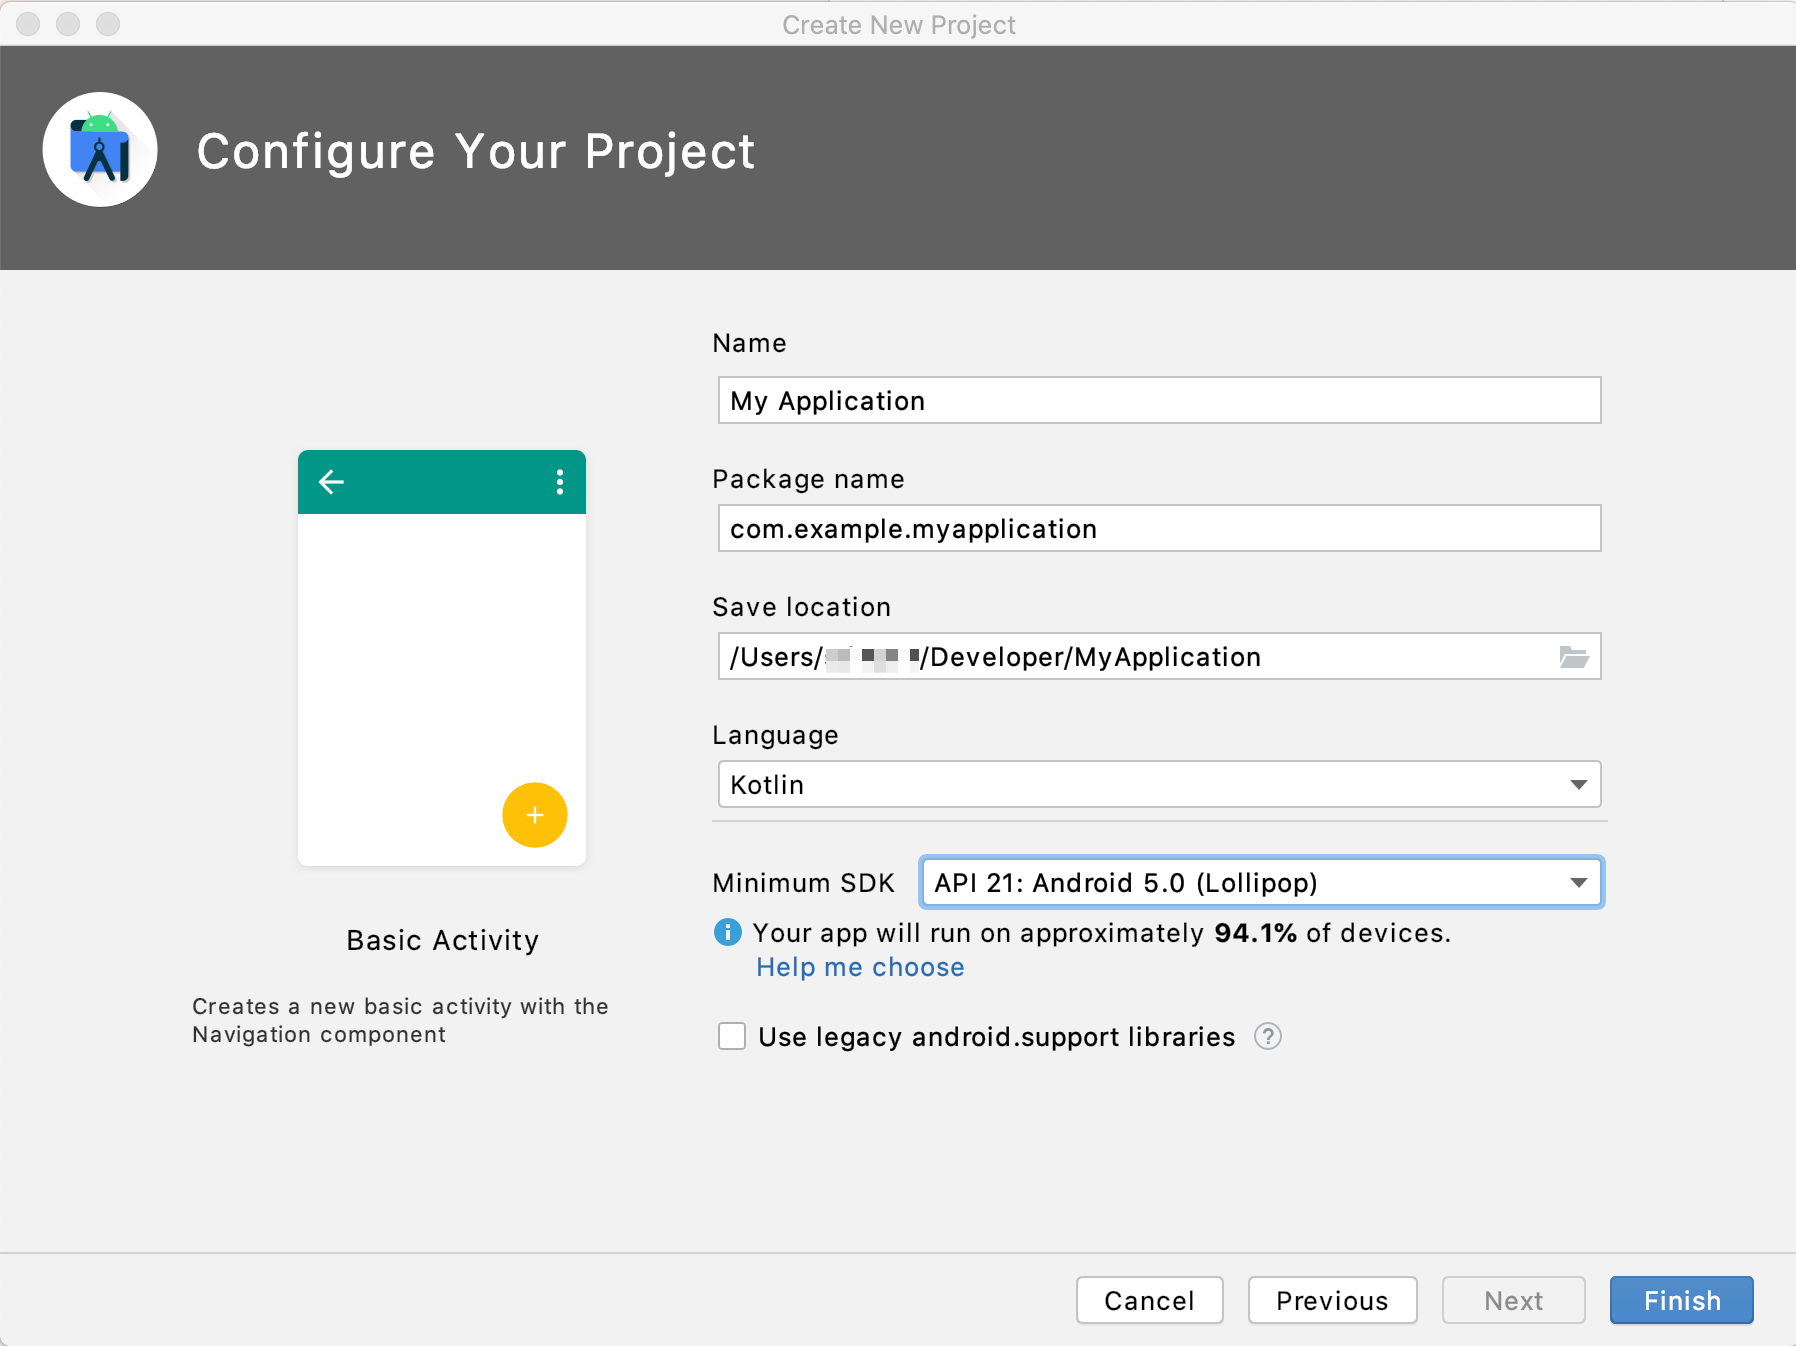
Configure Your Project screen from Android Studio. Set the minimum Android SDK version to API 21.
Set the project minimum SDK to API 21: Android 5.0 (Lollipop)
The Kustomer Chat Android SDK requires at a minimum Android API version 21 (that is, Android 5.0 Lollipop). See Requirements to learn more.
You can update the Name and Save location for your project as needed.
Select Finish to create your new Android app.
Step 1.3
When the new app loads in Android Studio, select Run > Run 'app' or select Control + R to run the sample app in the emulator. The new app may take a few minutes to load in Android Studio.
The emulator renders the sample app to display a new screen with your application name, a "Hello first fragment" message, a Next button, and an email icon.
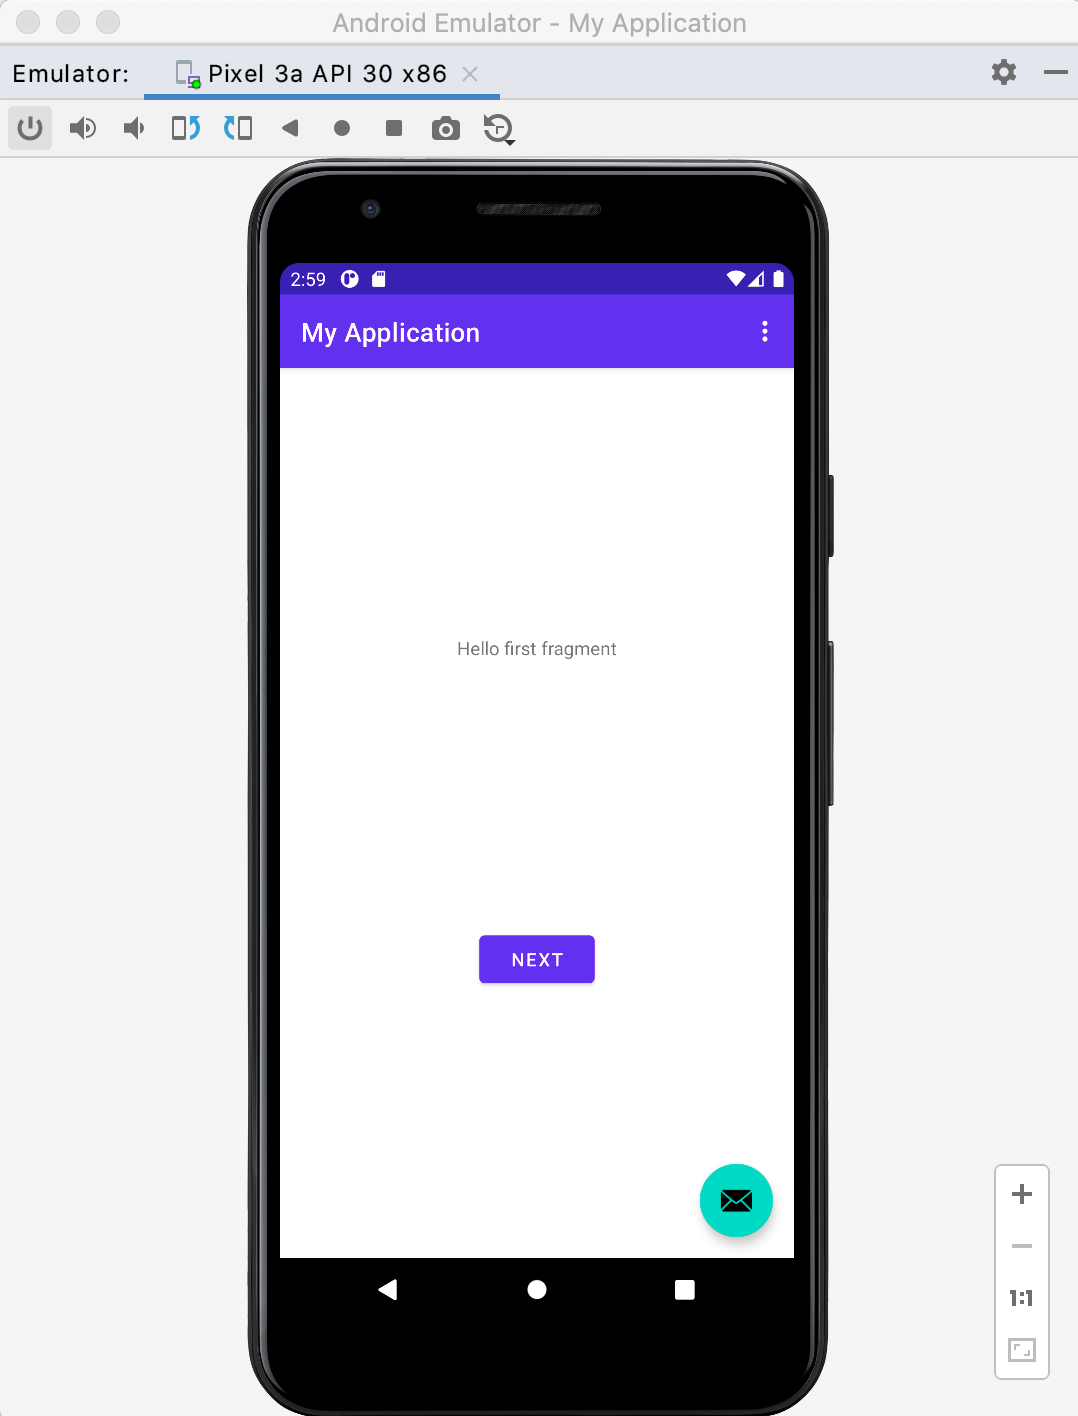
Sample app with Basic App configuration rendered in the Android Studio emulator.
After you run the sample app in the emulator, continue to Step 2: Add the Kustomer Chat SDK.
Step 2: Add the Kustomer Chat SDK
Next, we'll add the Kustomer Chat SDK as an app dependency to your build.gradle files and create a new Application class to initialize the Chat SDK.
Application class
Most apps should already have an Application class. You can use the Application class to define and configure any tools or third-party SDKs to initialize when the app starts. To learn more, visit the Android Developer documentation.
Step 2.1
Open the Gradle Scripts for your project. You'll see two build.gradle files: a Project-level file and a Module-level file.
First, open the Module-level build.gradle (:app) file. Locate the dependencies block and add the latest version of the Kustomer Android SDK as a dependency.
dependencies {
  implementation 'com.kustomer.chat:ui:<<Android_SDK_Version>>'
  // Other dependencies
  ...
}
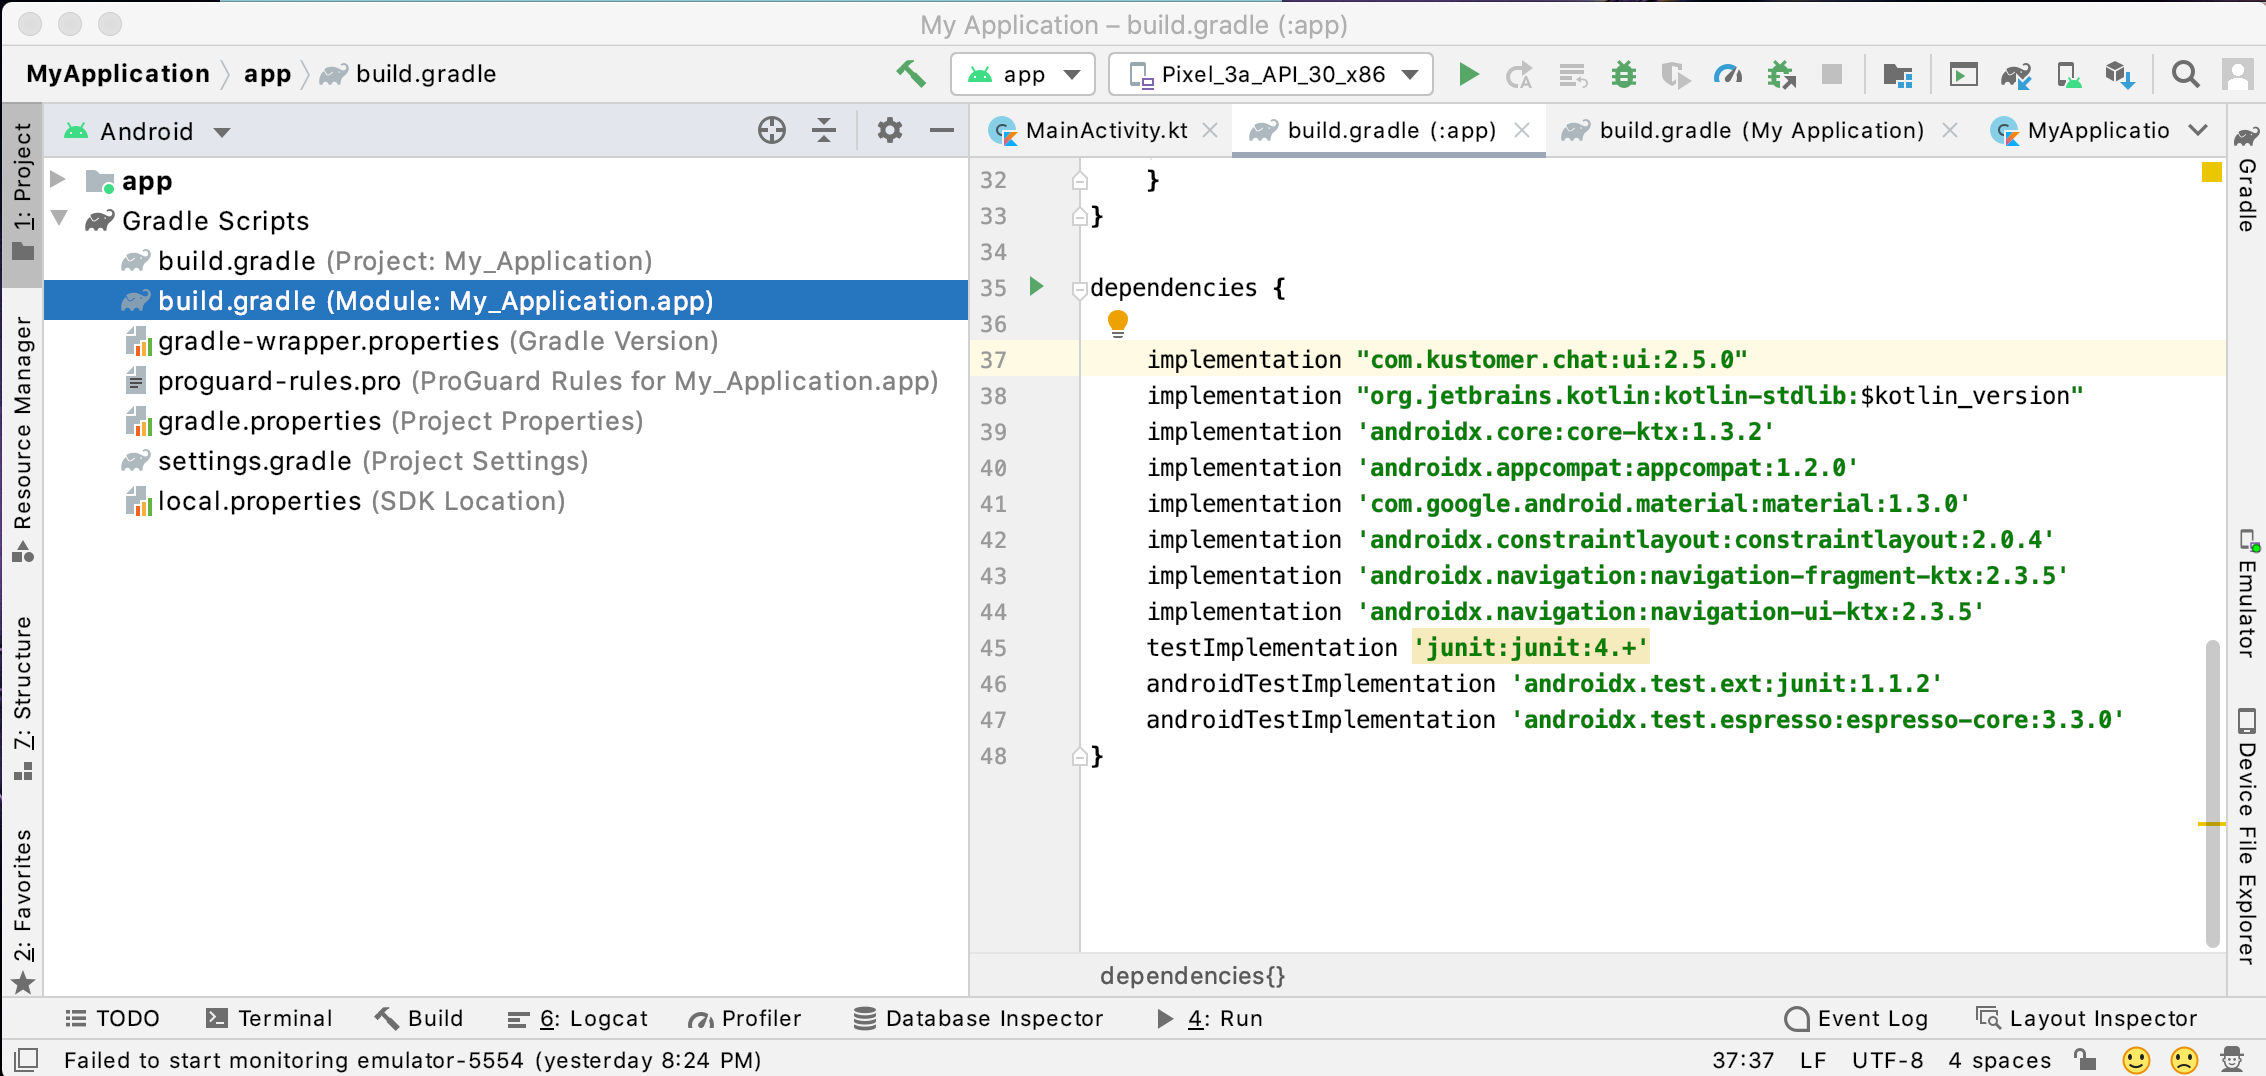
Add the latest Kustomer Chat SDK version to your App-level Gradle file.
Next, open the Project-level build.gradle file. Locate the allprojects block and add mavenCentral() to access the Kustomer Android SDK repository.
allprojects {
  repositories {
    mavenCentral()
    // Other repositories
    ...
  }
}
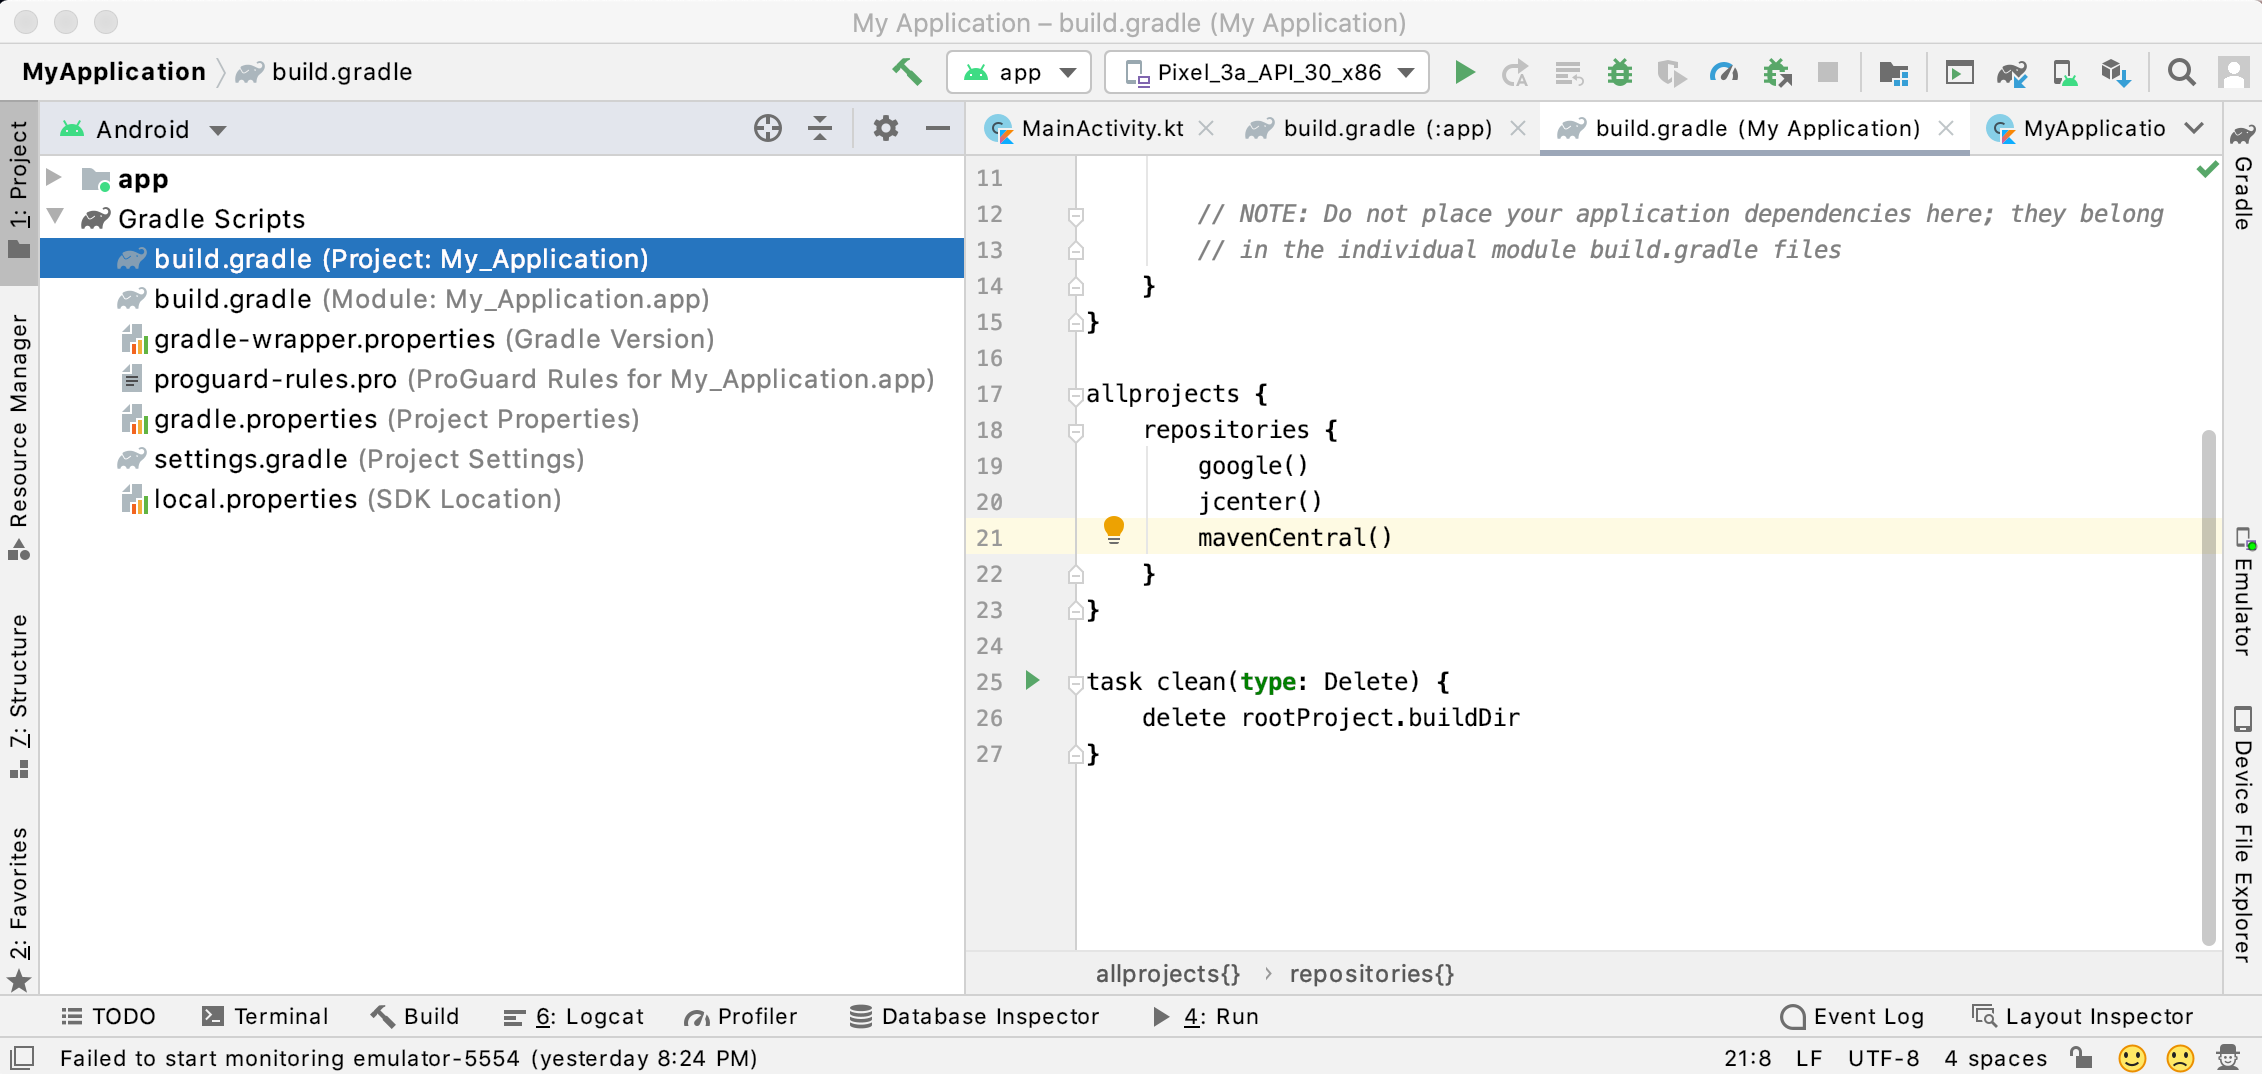
Add Maven Central to your Project-level Gradle file.
After you update both build.gradle files, sync your Gradle file updates in Android Studio. You can either select Sync Now in the Android Studio banner or select from the toolbar the Sync Projects with Gradle Files Gradle elephant icon.

Select Sync Now from the banner or select Sync Projects with Gradle Files from the Android Studio toolbar to sync your Gradle file updates.
Step 2.2
After you sync your Gradle file updates, go to app > java > com.example.{your-application-name} and create a new Kotlin file named MyApplication to create a new Application class.
Your new MyApplication.kt file appears in your com.example.{your-application-name} folder along with the existing default Kotlin files: FirstFragment, MainActivity, and SecondFragment.
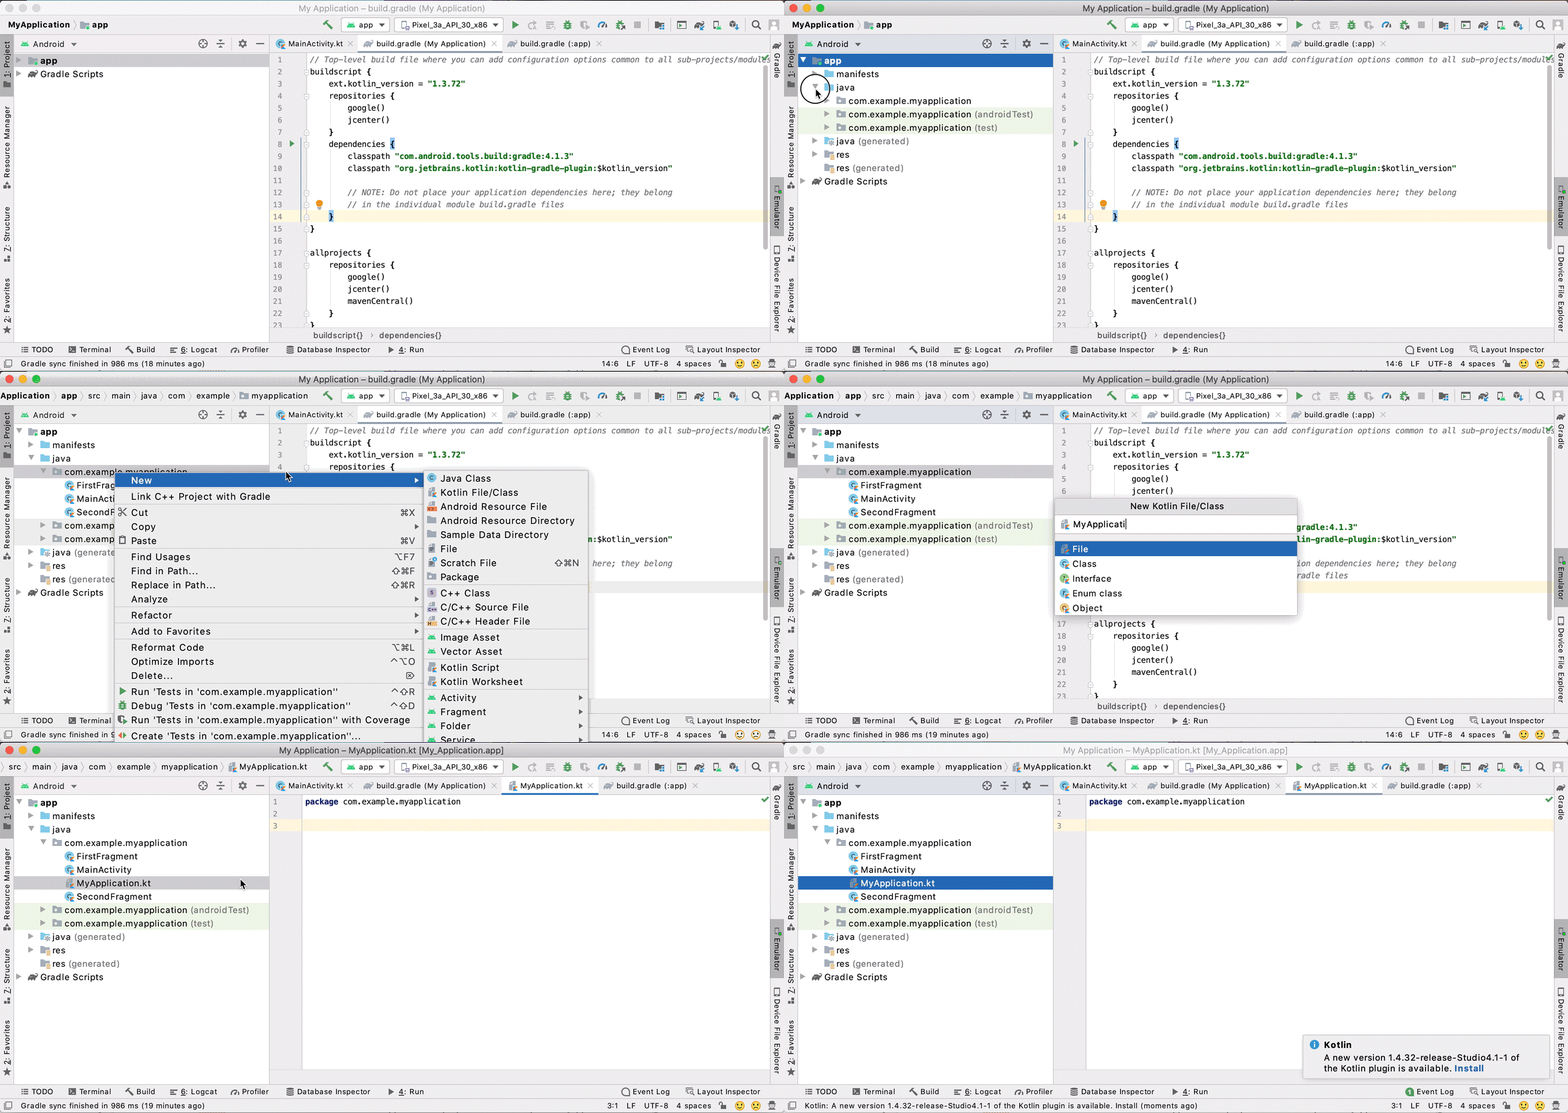
Create a new Kotlin file with the name MyApplication.
Step 2.3
In your new MyApplication.kt add the following code snippet after package com.example.{your-application-name} to initialize the Kustomer Chat SDK with your API key.
Set the apiKey variable to a valid API for your Kustomer organization.
Use a Kustomer API key with
org.trackingroleTo implement the Android Chat SDK, you'll need a Kustomer API key with the
org.trackingrole for your Kustomer organization. To learn more, see Requirements.
import android.app.Application
import com.kustomer.ui.Kustomer

// Override the Application class to create your own implementation

class MyApplication : Application() {
  override fun onCreate() {
  	super.onCreate()
    Kustomer.init(application = this, apiKey = "Your Kustomer API key with org.tracking role") {
    }
  }
}
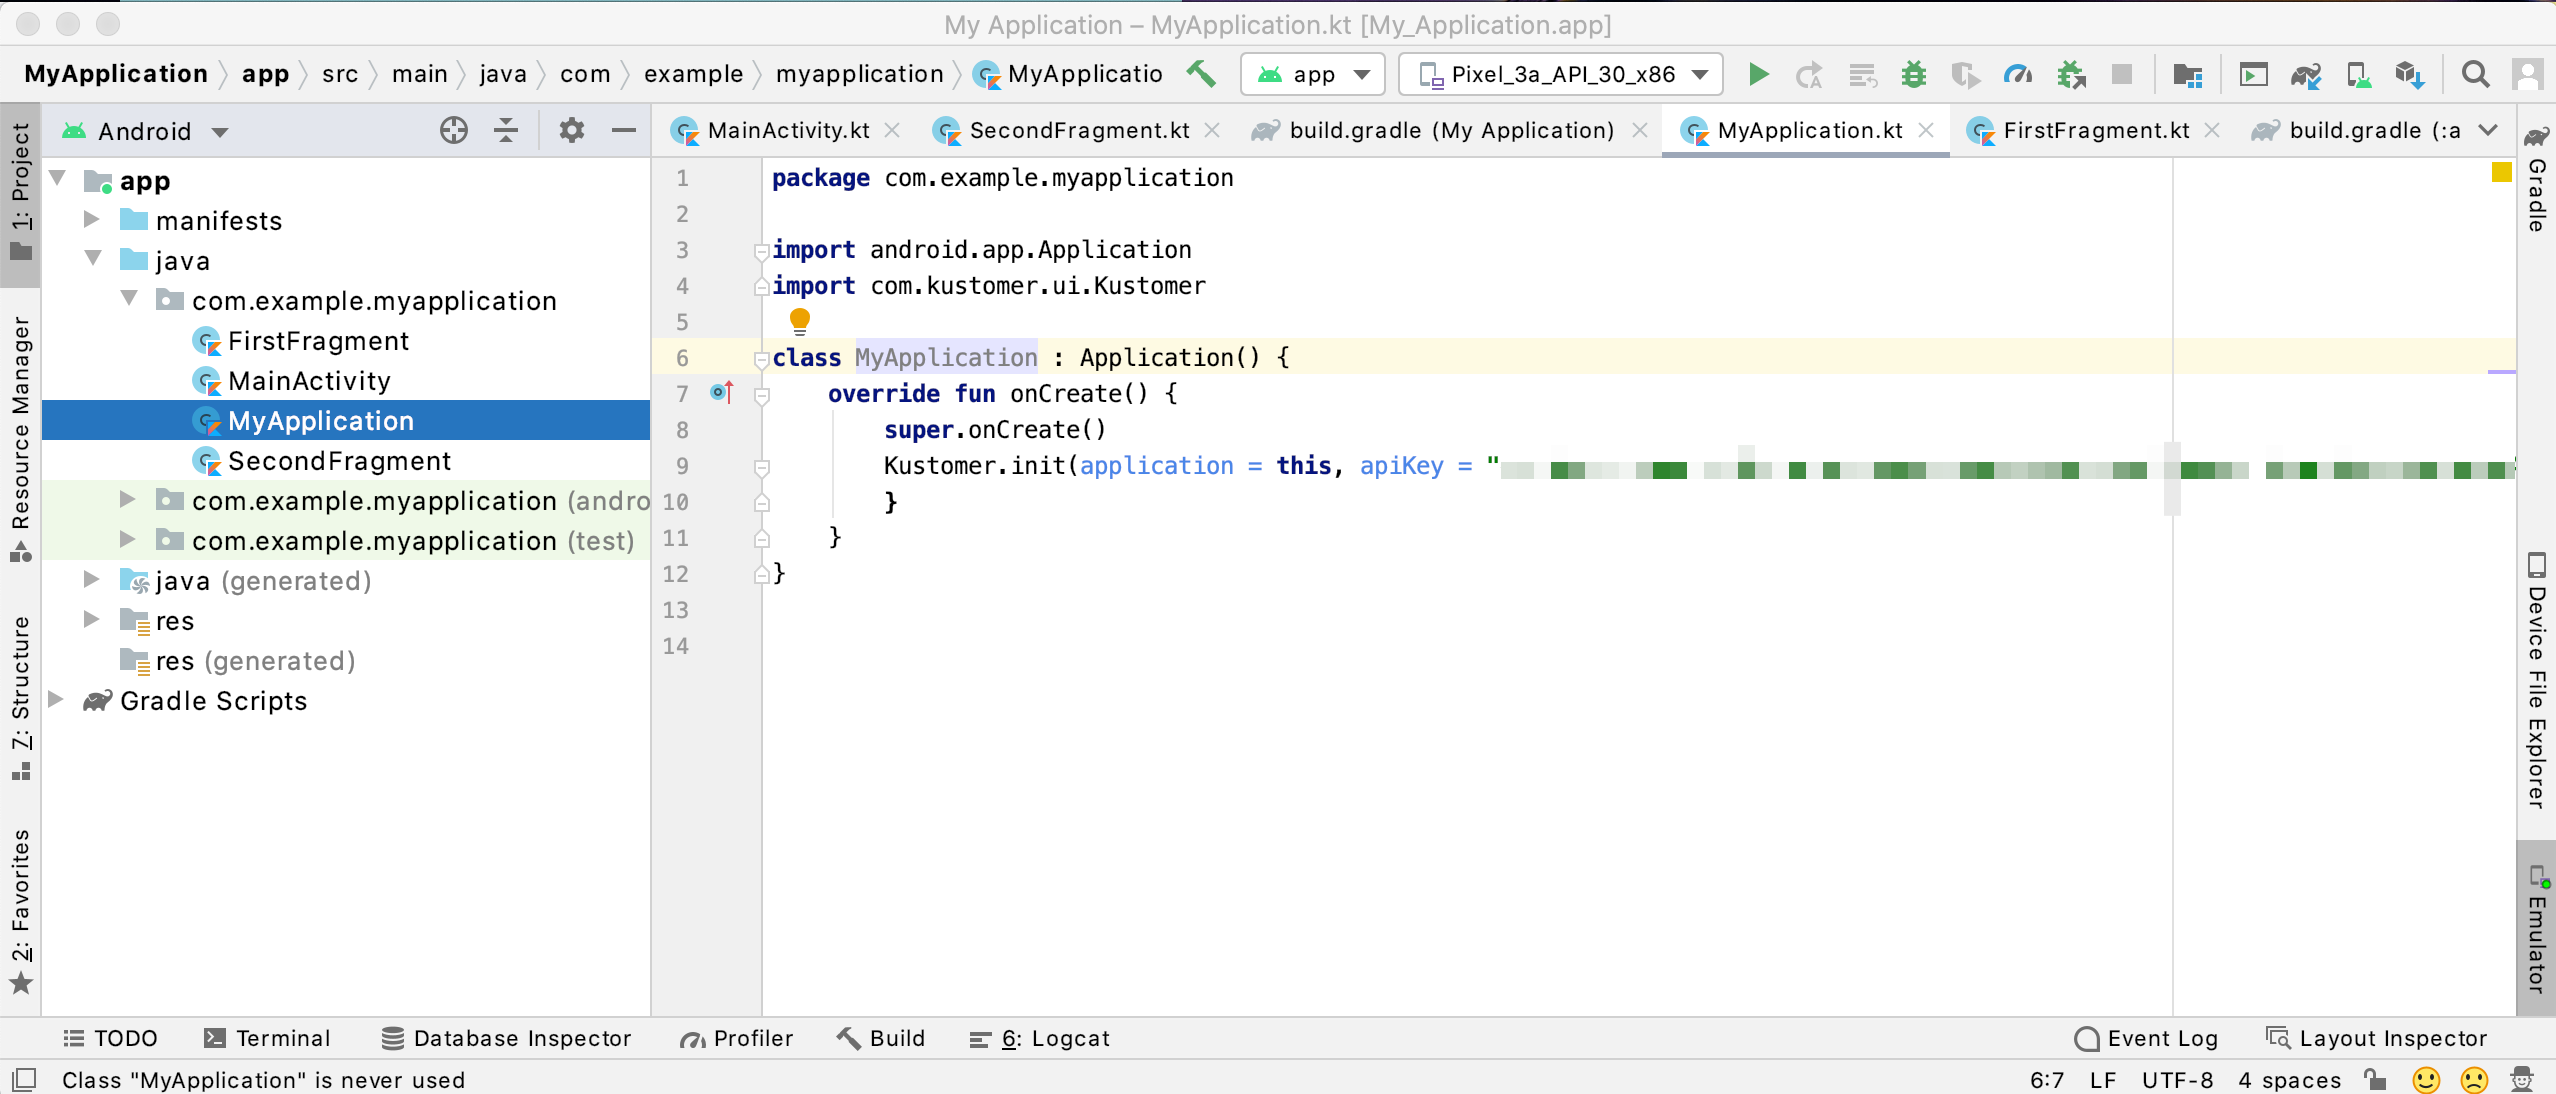
Initialize the Kustomer Chat SDK with a valid API key in your Application class.
Step 2.4
After you create the new Application class, go to app > manifests and add the new Application class as an attribute to the application tag in your AndroidManifest.xml file to allow your app to use the custom Application class:
...
	<application
  	android:name=".MyApplication"
  ...
	</application>
...
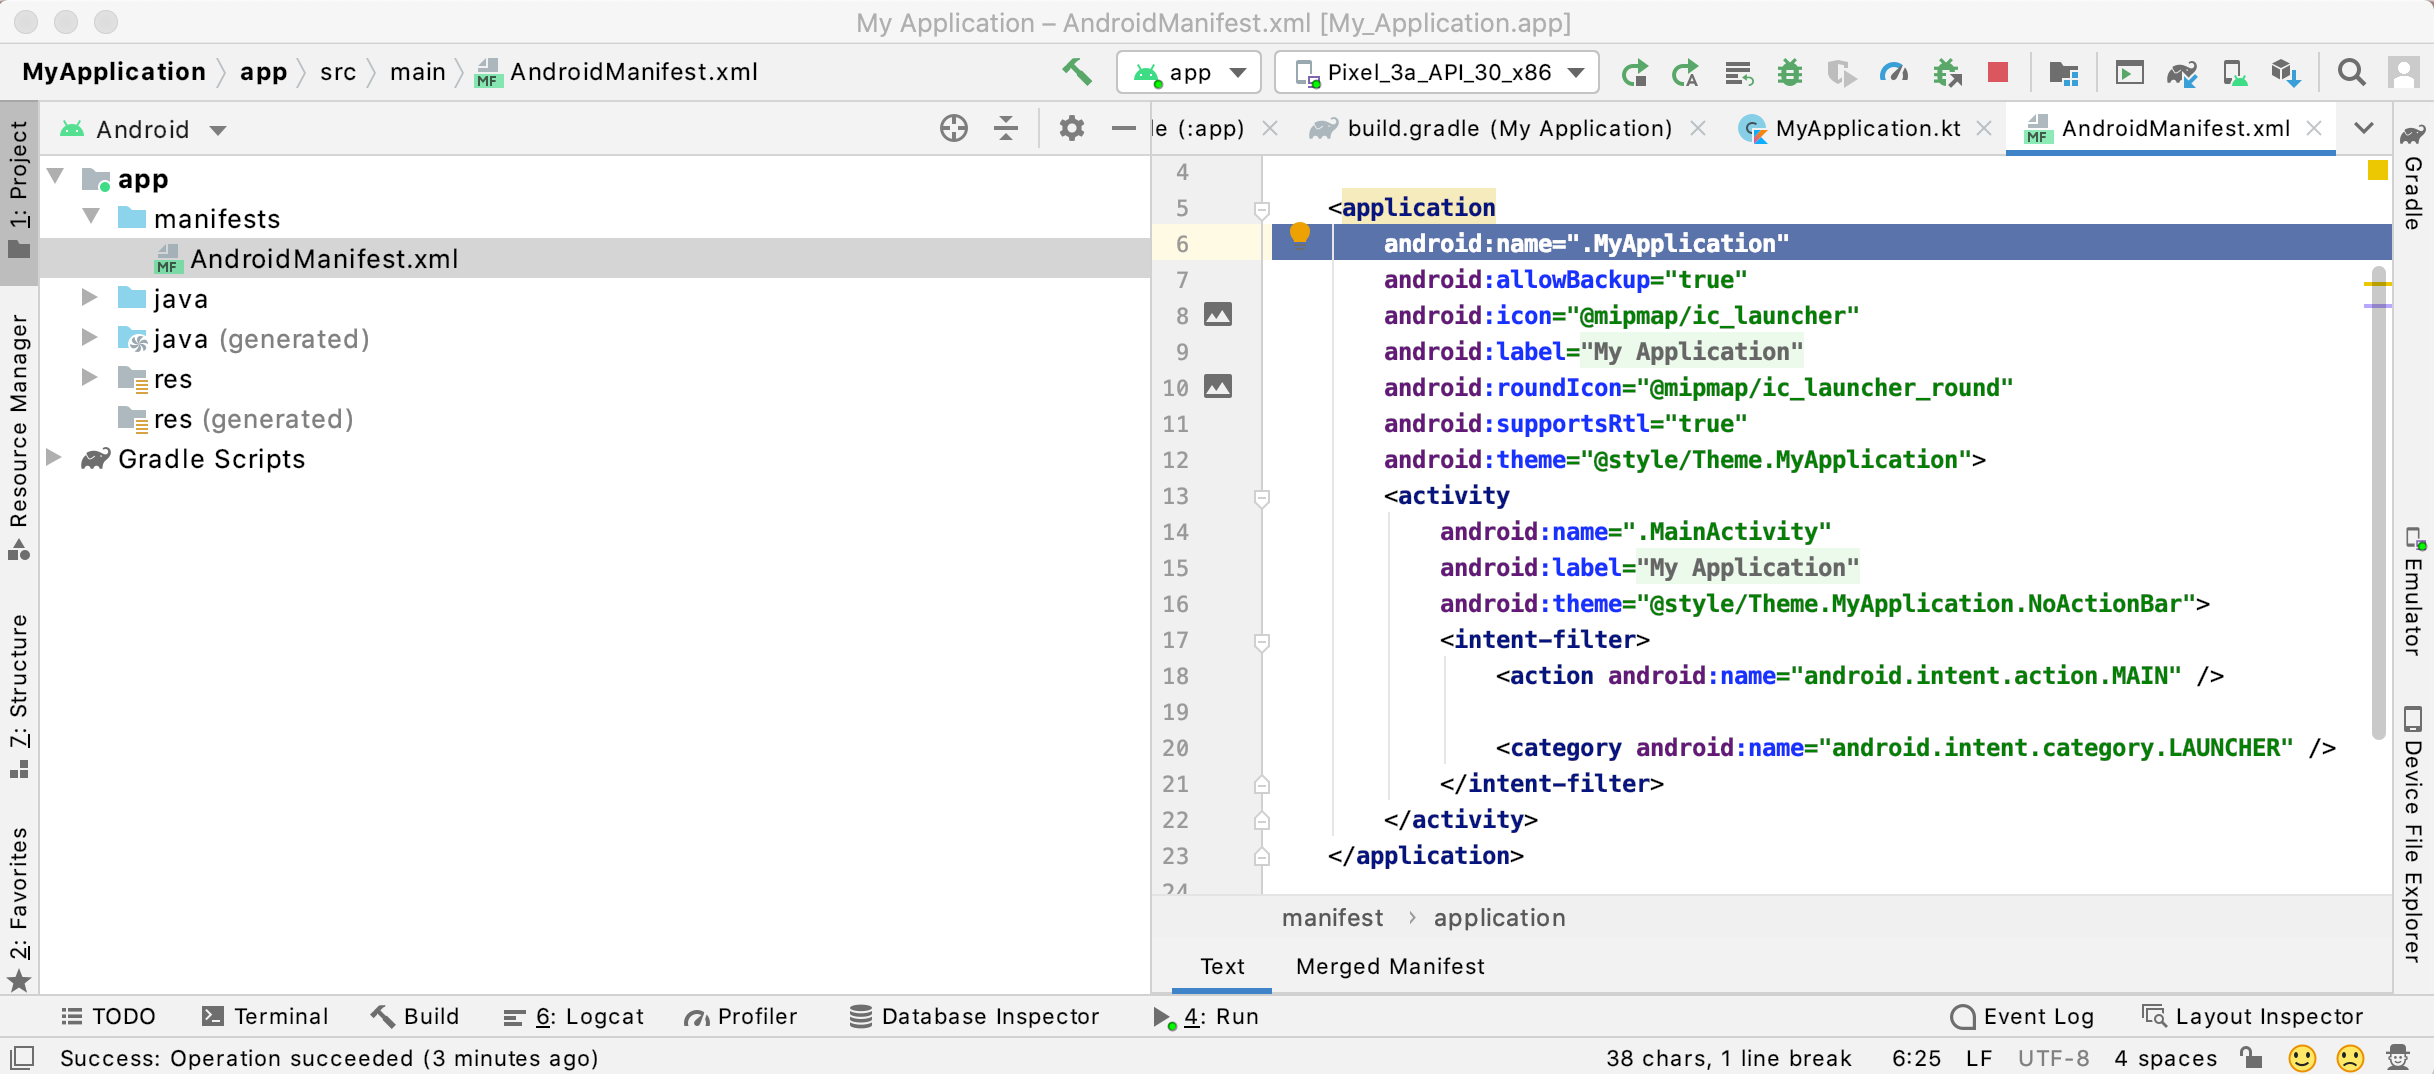
Add the new Application class as an attribute to the <application> tag in your AndroidManifest.xml file.
After you set up your new Application class and save your project, continue to Step 3: Launch the Kustomer Chat SDK.
Step 3: Launch the Kustomer Chat SDK
Next, we'll launch the Kustomer Chat SDK by opening a new conversation.
Step 3.1
First, go to app > java > com.example.{your-application-name} and open the MainActivity.kt file.
In the default code, the app displays a snackbar with the message "Replace with your own action" when you tap the floating action button in the sample app.
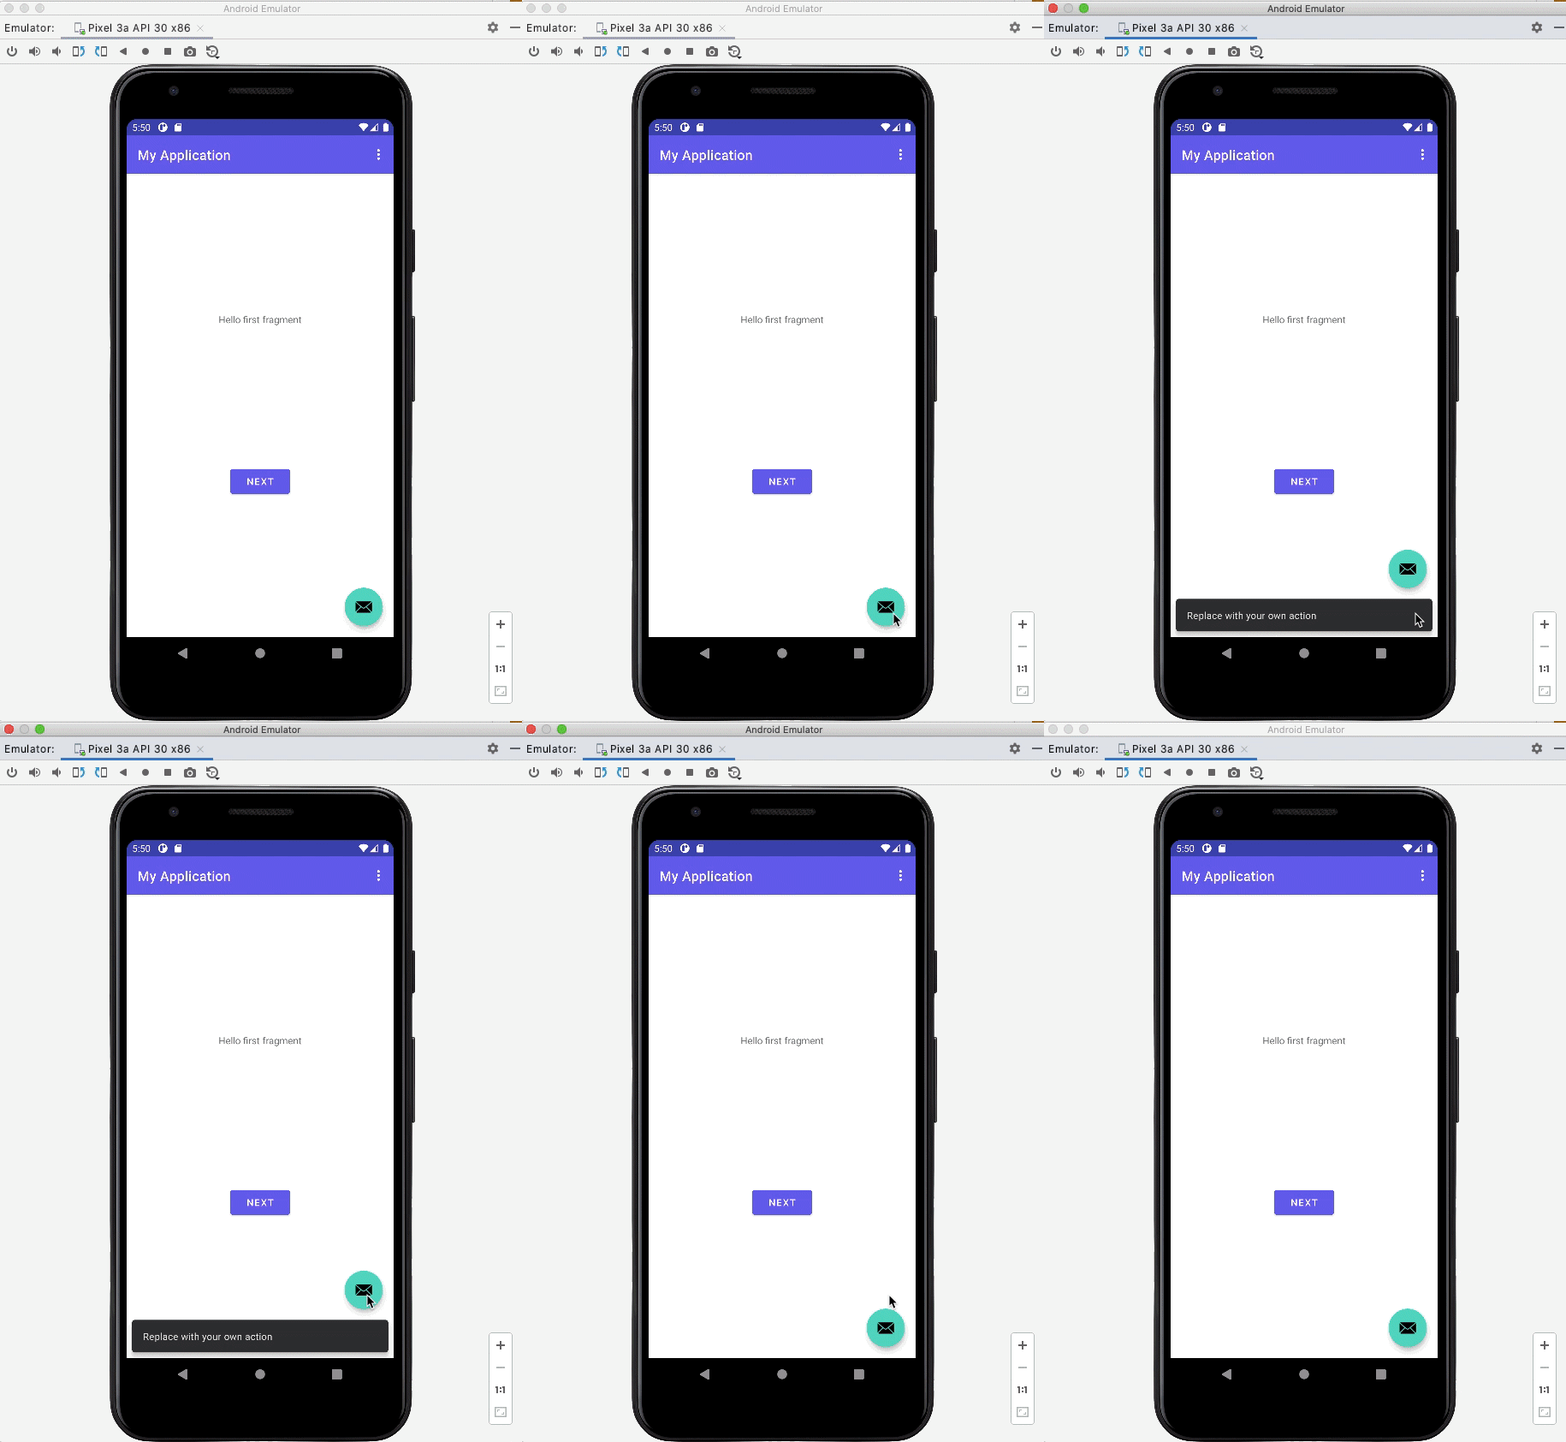
The default app displays a snackbar message when you tap the floating action button.
We'll replace the snackbar code with code that launches the Kustomer Chat SDK and opens a new conversation when you tap the floating action button.
Enable Chat 2.0 settings for your default brand
To implement the Android Chat SDK, Chat 2.0 settings must be enabled for your Kustomer organization. To learn more, see Chat Management: Settings in the Kustomer Help Center.
class MainActivity : AppCompatActivity() {

    override fun onCreate(savedInstanceState: Bundle?) {

        findViewById<FloatingActionButton>(R.id.fab).setOnClickListener { view ->
        		Kustomer.getInstance()
          			.openNewConversation()
        }
    }
class MainActivity : AppCompatActivity() {

    override fun onCreate(savedInstanceState: Bundle?) {

        findViewById<FloatingActionButton>(R.id.fab).setOnClickListener { view ->

          // Remove the default click listener (displays the snackbar message)
          	// Snackbar.make(view, "Replace with your own action", Snackbar.LENGTH_LONG)
            	//.setAction("Action", null).show()

          // Update the click listener to open a new conversation
          	Kustomer.getInstance() // Launches the Kustomer Chat SDK
          			.openNewConversation() // Opens a new chat conversation
        }
    }
class MainActivity : AppCompatActivity() {

    override fun onCreate(savedInstanceState: Bundle?) {

				// Default click listener (displays the snackbar message)

        findViewById<FloatingActionButton>(R.id.fab).setOnClickListener { view ->
            Snackbar.make(view, "Replace with your own action", Snackbar.LENGTH_LONG)
            	.setAction("Action", null).show()
        }
    }
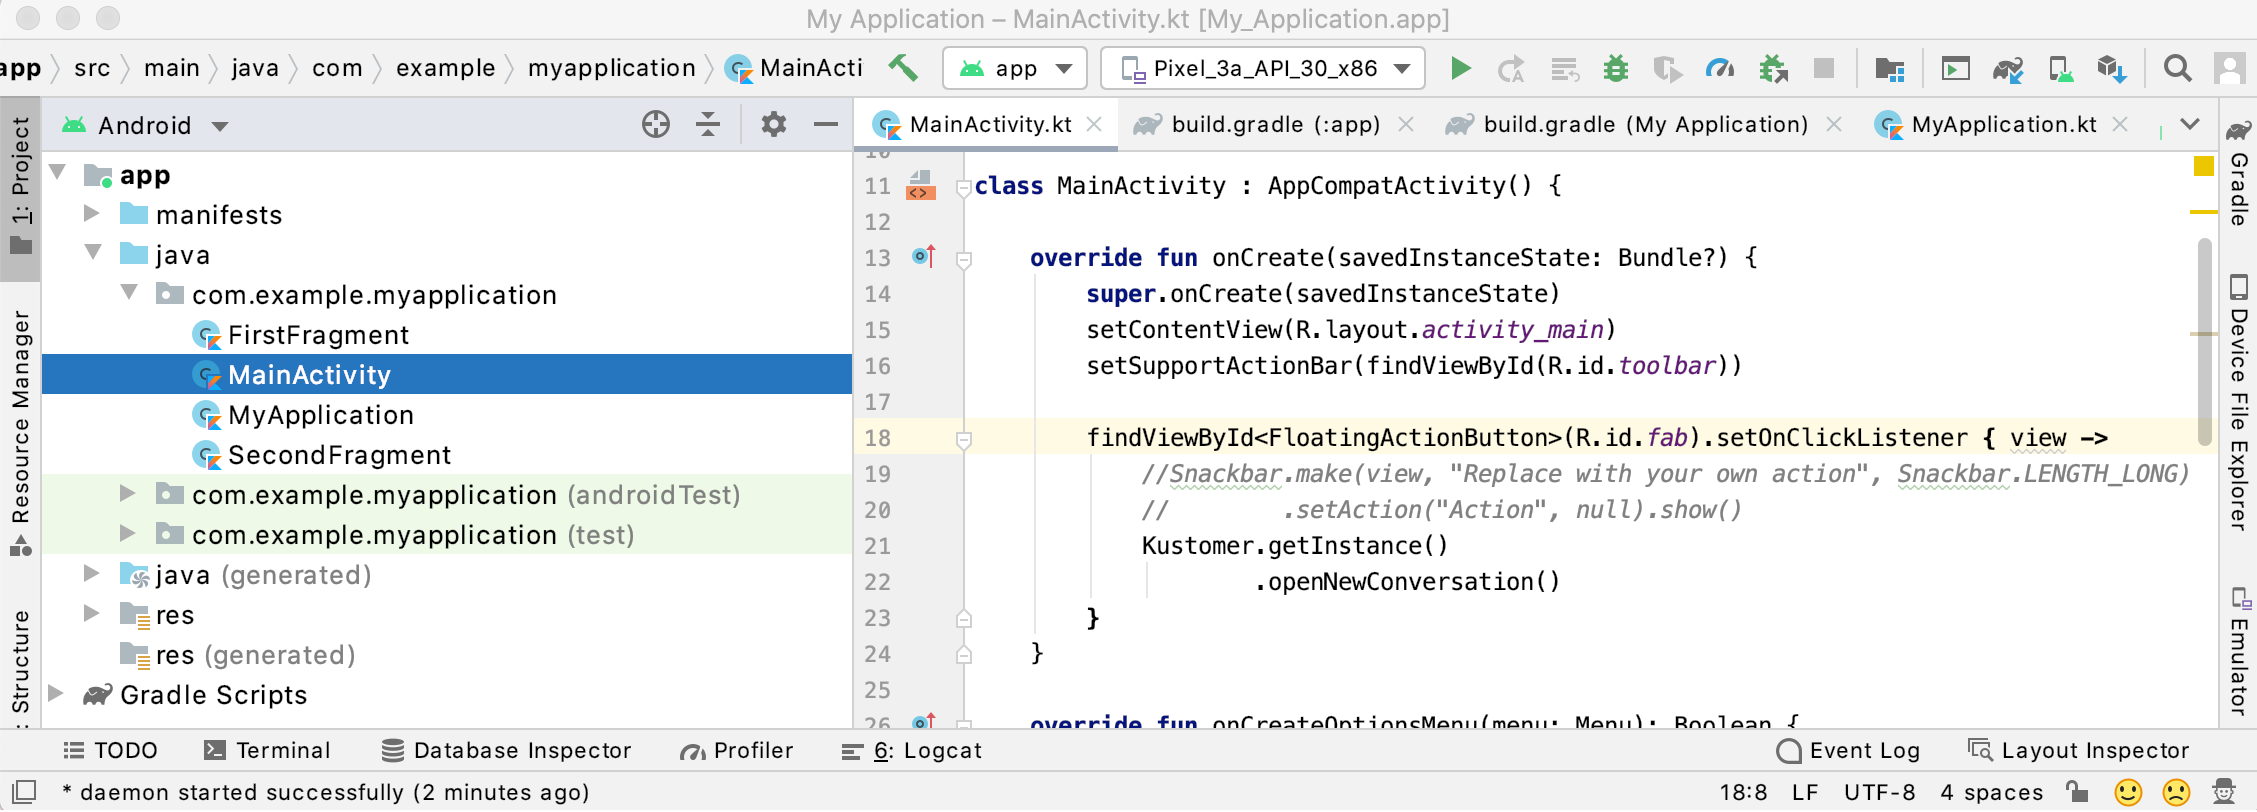
Launch the Kustomer Chat SDK and open a new conversation in your MainActivity.kt file.
Step 3.2
After you update your MainActivity.kt file, select Run > Run 'app' or select Control + R to run the sample app in the emulator with the updated code.
Tap the floating action button to launch the Kustomer Chat SDK and open a new conversation in your app. The Chat SDK will reflect the [settings of the default brand for your Kustomer organization.
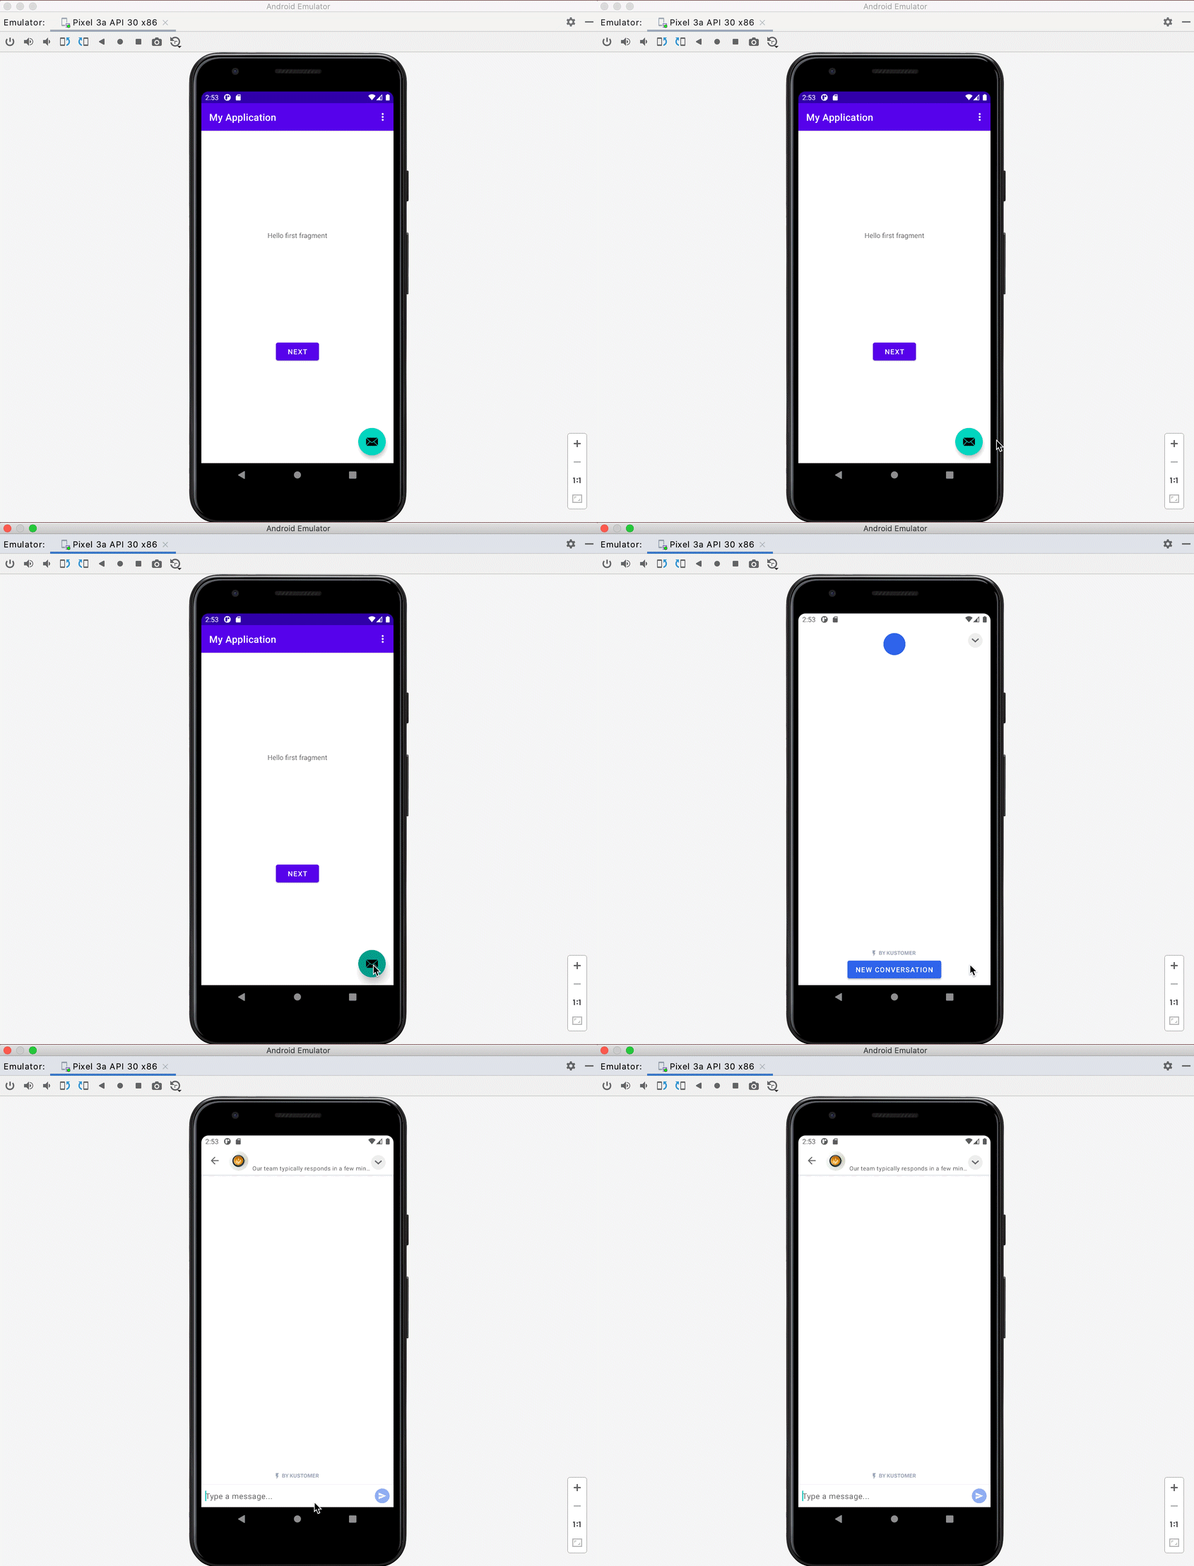
Tap the floating action button to launch the Kustomer Chat SDK and open a new conversation.
Summary
Congratulations on completing the quick start guide!
Here's what we learned how to do in this tutorial:
- How to create and run a sample app in Android Studio
- How to add the Kustomer Chat SDK as an app dependency in your Gradle files
- How to configure the Kustomer Chat SDK in a new Application class
- How to launch the Kustomer Chat SDK and open the chat widget in a sample Android app
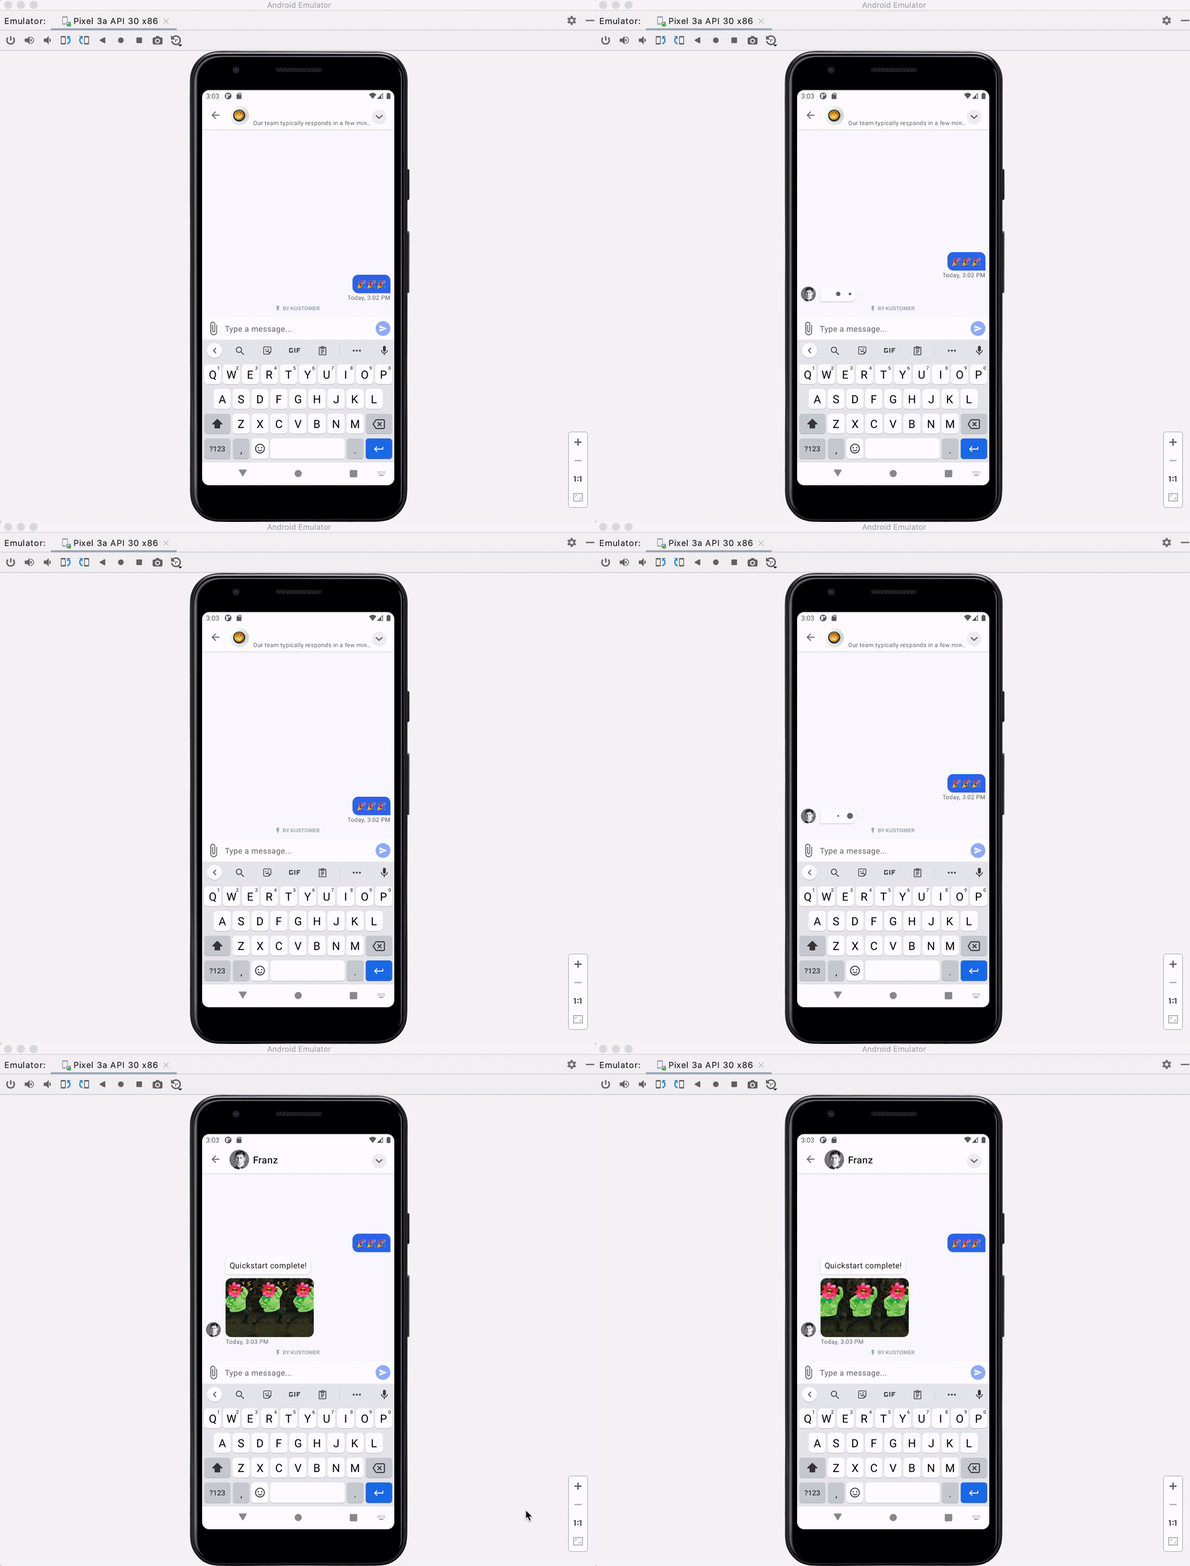
Congrats on launching the Kustomer Chat SDK!
Explore additional SDK installation and configuration resources
This guide offers a condensed version of how to install and implement the Kustomer Chat SDK for an Android app. You can explore additional resources on how to install and configure the Chat Android SDK:
Visit Installation to learn how to initialize the SDK with options.
Visit Localization to learn how to change and override the default language settings.
Visit Customize Colors to learn how to customize the chat widget colors for your app.
Updated almost 2 years ago