Tutorial: Create a GIPHY app
Learn how to create a GIPHY app that allows the agent to search for, copy, and add a random GIF into the customer conversation from the agent timeline.
Important
Always use a sandbox account or test organization to complete tutorials. You won't be able to uninstall an app once you register the app to an organization.
If you need to request a sandbox account or a test organization for development, see Getting access. If you register an app to a Kustomer organization by accident, you can contact [email protected] to remove the app from view.
This introductory tutorial shows you how to build an app that combines iFrame-based Klass Views (or KViews), Commands, and App Settings to connect with an external API and create a powerful UI experience in Kustomer.
For this tutorial, we'll use the GIPHY API and the Kustomer Cards SDK to build a private app that will configure a Klass View that allows the agent to search for, copy, and add a random GIF into the customer conversation from the agent timeline.
Tutorial goals
By the end of this tutorial, you'll know how to:
- Build a rich UI in Kustomer with the Cards SDK and Klass Views
- Make authenticated calls to an external service with App Settings and Commands
- Build, register, and update an app with the Kustomer App Starter Config repo
Prerequisites
Before you get started, make sure you have the following:
Access to Kustomer and apps platform resources
- Access to a sandbox account or test organization with at least Administrator access
- A valid API Key that includes the following roles at the minimum:
org.admin.appsandorg.permission.apps - The base URL for your API with your Kustomer organization name
- Example:
https://organization-name.api.kustomerapp.com
- Example:
- (Recommended) Familiarity with the Kustomer App Starter Config repository available on GitHub to generate and register a JSON app definition from JavaScript files.
Access to external services
- A valid API key for the GIPHY API
- A way to host a web page (you can use a Glitch web project)
- NPM (required to register and update apps with Kustomer App Starter Config repo)
Step 1: Create a web project
In this tutorial, we'll use a web project hosted outside of Kustomer for a portion of the GIPHY app.
We recommend using a Glitch Web Project, although you can host this web project however you'd like.
First, we'll create a simple static web page with the following HTML, CSS, and JavaScript samples.
Create a web page
Use the following HTML as a scaffold of the app:
<!DOCTYPE html>
<html lang="en">
  <head>
    <link rel="stylesheet" href="/style.css" />
    <script
      src="https://cdn.kustomerapp.com/card-js/latest/kustomer-card.js"
      defer
    ></script>
    <script src="/script.js" defer></script>
  </head>
  <body>
    <div class="searchContainer">
      <span>Search: </span>
      <input id="search" placeholder="Add a search term" />
    </div>
    <div id="imgContainer"></div>
    <div class="controls">
      <button id="copy">Copy Image Link</button>
      <button id="newImage">Get New Image</button>
    </div>
  </body>
</html>
Add styling to the page
We'll add CSS variables for Dark Mode support in Kustomer. These CSS variables will match the background and text color with the selected user theme when the app is embedded in Kustomer.
Use the following CSS to add basic styling to the page:
body {
  font-family: helvetica, arial, sans-serif;
  padding: 20px;
  min-height: 280px;
  background: var(--background-primary-color);
  color: var(--font-primary-color);
}

.container {
  display: flex;
  flex-direction: column;
  align-items: center;
}

#imgContainer {
  margin: 15px 0;
  width: 200px;
  height: 200px;
  display: flex;
  align-content: center;
  justify-content: center;
}
Initialize the Cards SDK
Next, add the Kustomer.initialize(); method to your script.js file to initialize the Kustomer Cards SDK.
We'll keep our JavaScript simple for now. The Kustomer.initialize(); method from the Cards SDK ensures that the page is sized correctly in the Klass View and has access to the Dark Mode CSS variables.
Kustomer.initialize();
Check your progress
Your web page should show the following:
- A Search box with the description Add a search term
- Two buttons: Copy Image Link and Get New Image

Sample web page with scaffold for the GIPHY app hosted in a Glitch project.
Step 2: Create and register a basic app
Now that we have an external web page, let's create an app that will embed the web page into Kustomer.
Create the app
You can use the Kustomer App Starter Config repository available on GitHub to generate and register a JSON app definition from JavaScript files.
To use the repository, you'll need to:
-
Select the Use this template option in GitHub to create a new repository. The new repository will start with the same files and folders as the
kustomer-app-starter-configrepo.You can then clone the new repository to your local machine.
-
Update the
.env.examplefile with the API base URL and API key for your organization. Rename and save the file as.env. Thenpmcommand in this repo pulls these environment variables to register and update apps.
API_BASE_URL=https://<organization-name>.api.kustomerapp.com
API_TOKEN=<API key with at least org.admin.apps and org.permission.apps roles>
- Add a new app subfolder to the
srcdirectory and add to the new folder anindex.jsfile with the code sample below. For this tutorial example, we will use the subfolder namegiphy-tutorial-app.
Replace the following:
- Replace
<organization>with the name of the test organization or sandbox account you're using to test the app. - For your site URL, use the URL of the web project page you created in Step 1.
Note: The app definition in the code sample defines a single Klass View, or KView. This KView appears for the Conversation resource as a smartbar-card and renders a DynamicCard that points to your web project page with the current Conversation object passed in as the context: context={context.conversation}.
const tutorialApp = "giphy_tutorial_<organization>";
const siteURL = "https://your-site-url-goes.here";

export default {
  "app": tutorialApp,
  "version": "0.0.1",
  "title": "GIPHY App Tutorial",
  "kviews": [{
     "name": tutorialApp + ".randomgiphy",
     "template": `<div>
        <DynamicCard
          src="${siteURL}"
          fillToWidth
          noPadding
          context={context.conversation}
        />
      </div>
      `,
     "context": "smartbar-card",
     "resource": "conversation",
     "meta": {
       "displayName": "Get a Random GIF",
       "icon": "image"
     }
  }]
};
- Since we are creating a new app definition, configure your root
src/index.jsfile to import and include your app definition in the apps array. The app starter config repo usesindex.jsfiles with commands to bundle together files into a complete app JSON definition.
import tutorialApp from './giphy_tutorial_<organization>';

const apps = [
    tutorialApp
];

export { apps as default };
import myFirstApp from './my-first-app';
import myFirstAdvancedKviewApp from './my-first-advanced-kview-app';
import myFirstWidgetApp from './my-first-widget-app';
import myFirstOutboundWebhookApp from './my-first-outbound-webhook-app';
import tutorialApp from './giphy_tutorial_<organization>';

const apps = [
    myFirstApp,
    myFirstWidgetApp,
    myFirstAdvancedKviewApp,
    myFirstOutboundWebhookApp,
    tutorialApp
];

export { apps as default };
To learn more, see Use the Kustomer App Starter Config.
Register the app
After you create a new app, run the npm run register-new-version command from your repository folder to register the app to your test organization or sandbox account.
Replace <organization> with the name of your Kustomer organization.
npm run register-new-version giphy_tutorial_<organization>
To learn more, see Register or update an app with commands.
If the npm command runs successfully, you will see a response and JSON body similar to the example below returned in the terminal.
The returned JSON body shows app data including the app version, the app id, app title, a unique app identifier, the app name, and more.
Namespacing for private apps
You'll notice a string of characters after your app name (for example,
giphy_tutorial_<organization>). The Kustomer Apps Platform automatically namespaces private app names with yourorgIdto ensure global uniqueness for theappname property.
> [email protected] register-new-version
> node ./_scripts/register-new-version "giphy_tutorial_<organization>"

{
  data: {
    type: 'available_app',
    id: 'giphy_tutorial_<organization>_<orgId>-0.0.1',
    attributes: {
      name: 'giphy_tutorial_<organization>_<orgId>',
      auth: {},
      version: '0.0.1',
      visibility: 'private',
      ...
      title: 'GIPHY App Tutorial',
      identifier: 'giphapp5',
      ..
      redirectUris: [],
      clientId: 'Your Client ID'
    },
    relationships: { org: [Object] },
    links: {
      self: '/v1/apps/available/giphy_tutorial_<organization>_<orgId>-0.0.1'
    }
  }
}
Check your progress
The new tutorial app should now be available in the App Directory for your Kustomer organization.
To find newly registered apps, go to Settings > Apps > App Directory, and select the Directory tab. If you don't see the GIPHY App Tutorial app, try refreshing your browser to load any new apps.
Install your tutorial app
Select and install your private GIPHY Tutorial App (not the publicly available GIPHY app). When you install the app, the app configures the Klass View as a context card for Conversation objects in the timeline.
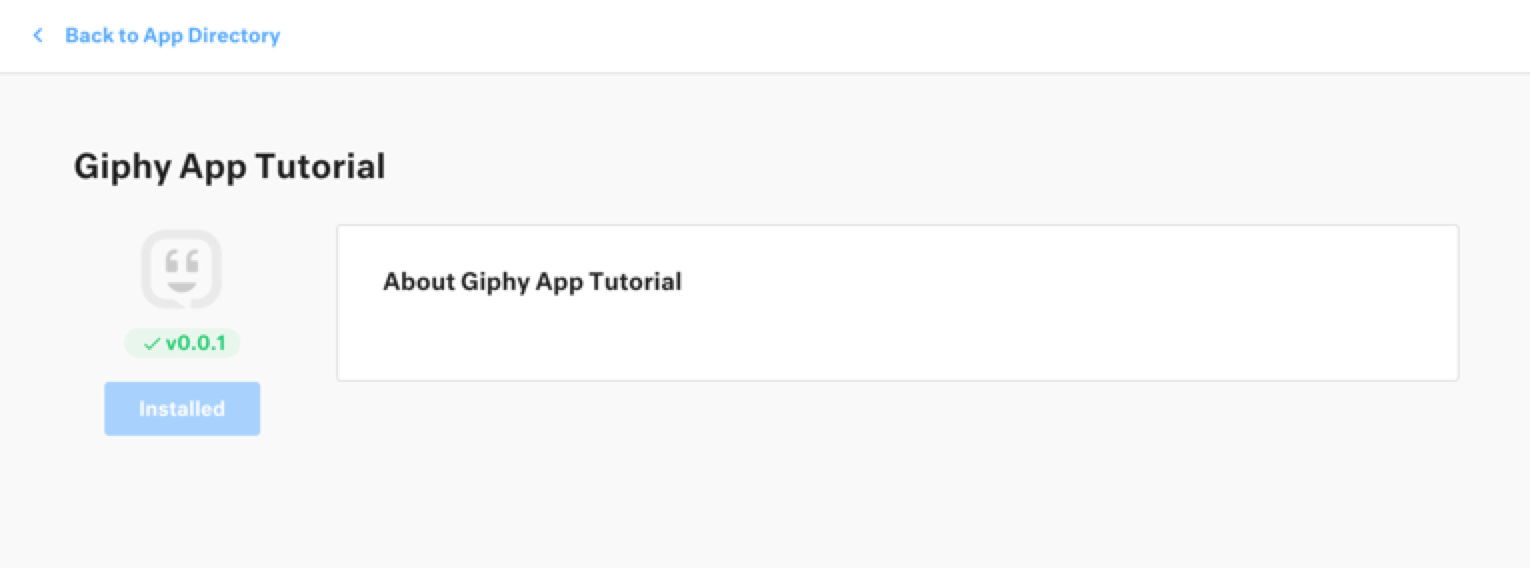
Install the GIPHY App Tutorial from the App Directory.
View your app-configured KView in Kustomer
After you install the app from the App Directory in Kustomer, select an existing conversation or create a customer with a conversation to view the configured KView.
When you open the conversation in the timeline, you will see the web page you created as a context card on the Insight panel. If you don't see your web page, try refreshing your browser and make sure you are viewing a Conversation object in the timeline.
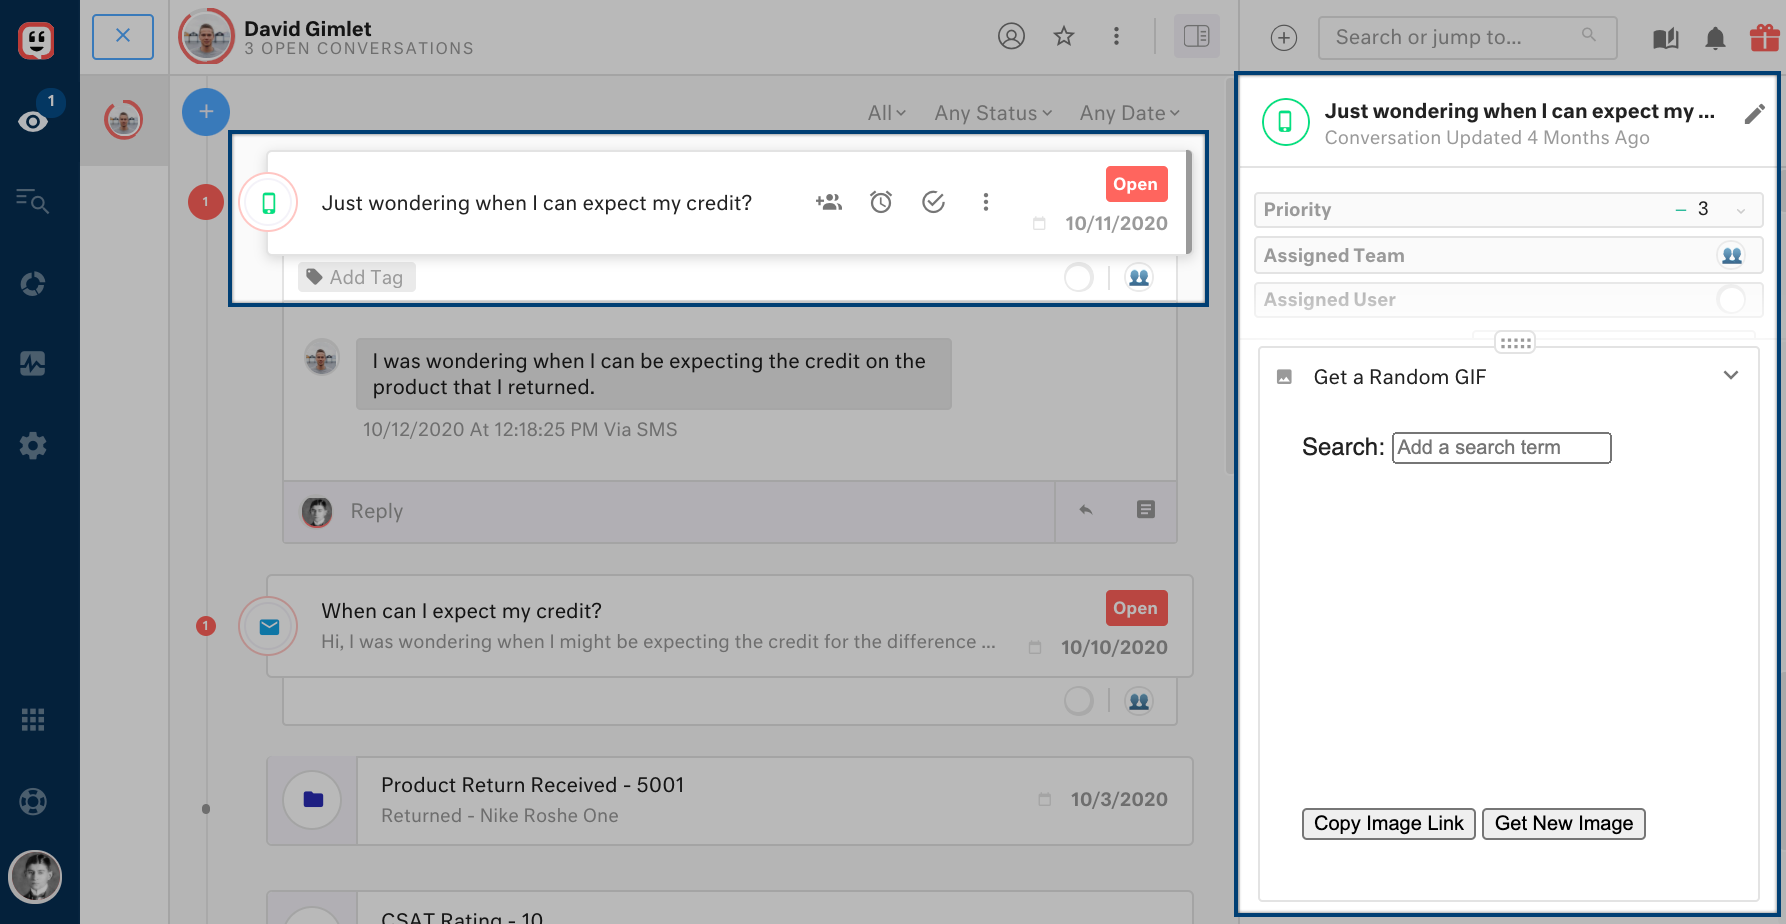
App-configured KView with iFramed web page.
Try out Dark Mode support
You can test out Dark Mode support for the app-configured KView. Go to your avatar in the navigation bar and select Appearance > Dark / Light to switch between Dark and Light themes in Kustomer. You'll notice that the iFramed web page in the KView automatically adjusts to match the set theme in Kustomer.
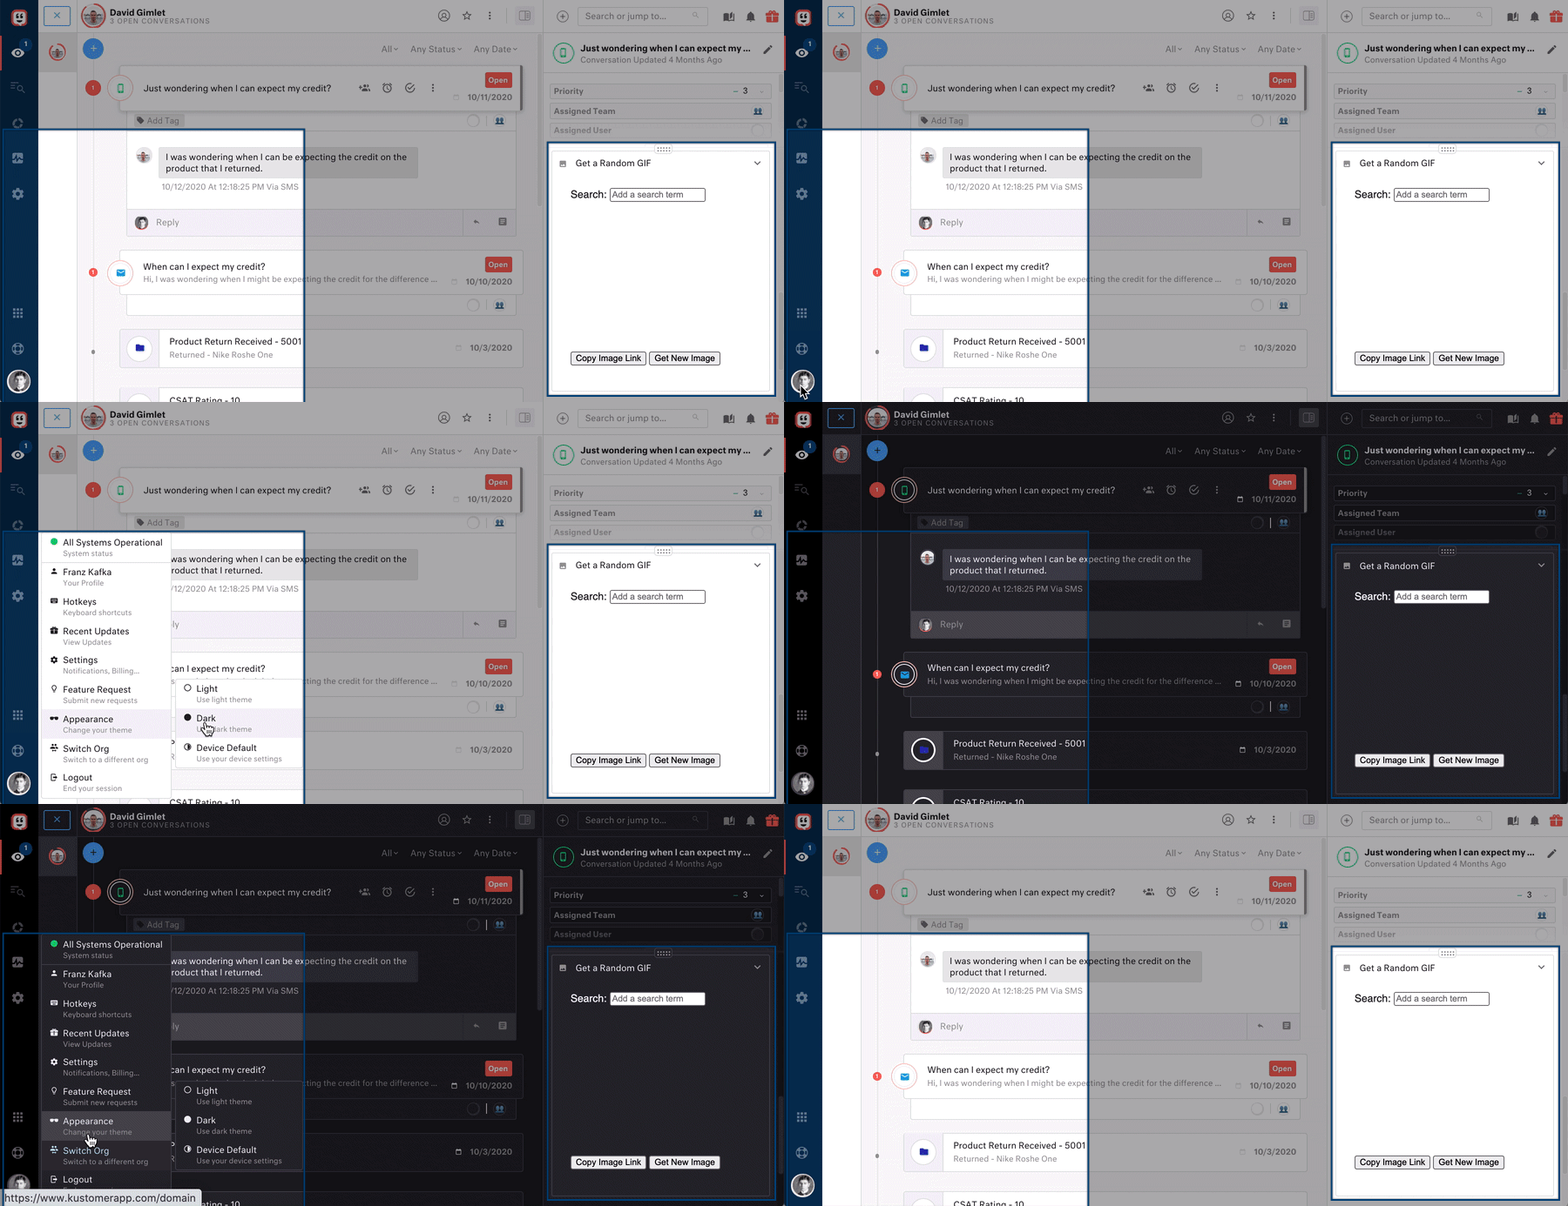
Dark Mode support for app-configured KView in Kustomer.
Step 3: Pull in information from Kustomer
We now have an app-configured KView for Conversation objects in the the customer timeline. The KView responds to the current Kustomer theme (Dark / Light mode).
Next, we'll update the web page to add more functionality to the KView to pull data from Kustomer.
Here, we want the conversation to inform the GIF search with context from Kustomer. Before we connect the web page to GIPHY, we'll expand out script.js file so that the web page can pull information from the related Conversation object for the KView.
In the expanded JavaScript, we will:
- Pull in the initial
contextvalue from theKustomer.initialize()method. When we created the app definition in Step 2, we set the context for this KView to be equal to the current Conversation object in Kustomer. - Save the subject of the conversation in a variable and make the variable the placeholder of our search input. This will show that the subject of the conversation will be the new default search term.
- Listen on the
contextevent after we pull in the initial context value to pull in any updates or changes to the conversation subject.
let subject;

const updateSubjectFromConversation = conversation => {
  subject = conversation.attributes.name;
  const searchElement = document.getElementById('search');
  searchElement.placeholder = subject;
};

Kustomer.initialize((conversation) => {
  updateSubjectFromConversation(conversation);
  Kustomer.on('context', updateSubjectFromConversation)
});
Check your progress
Here, we don't need to update our app version because we are only changing the web page. Once you update the web page, those changes are reflected in the "Get a Random GIF" KView.
Close and open the KView or refresh your browser to view the changes.
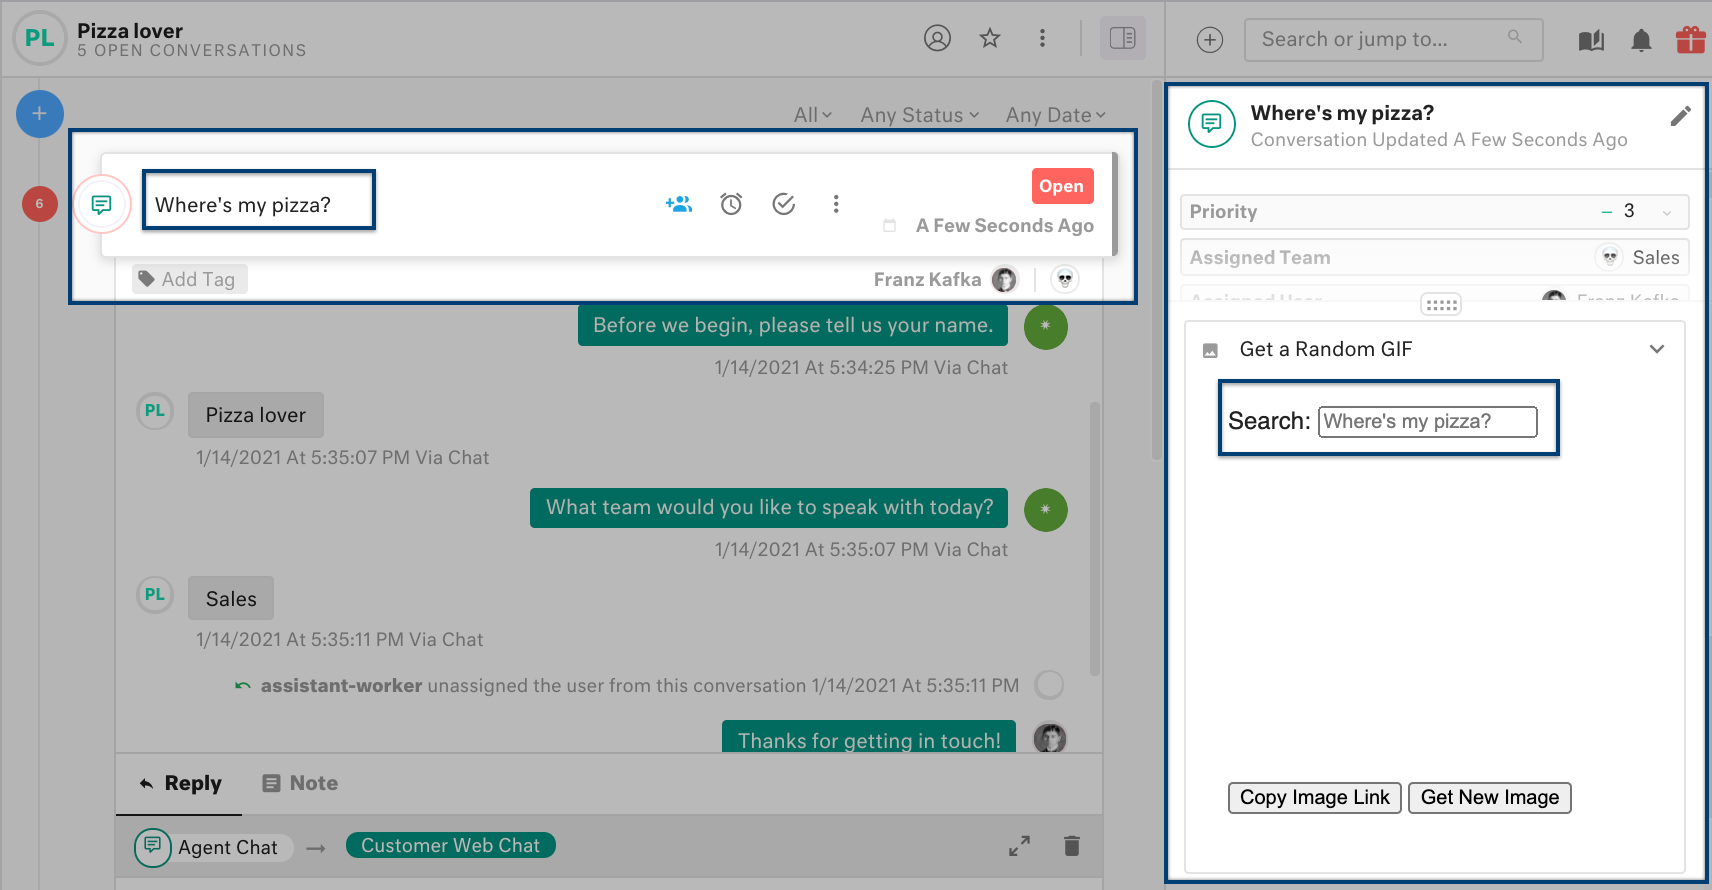
The subject of the conversation is reflected as the default search term in the KView.
Try changing the subject of your conversation
Take a moment to test out the updated KView in your timeline. If you change the subject of your selected conversation and press Enter to save, you should see the new conversation subject reflected in the search input in the KView.
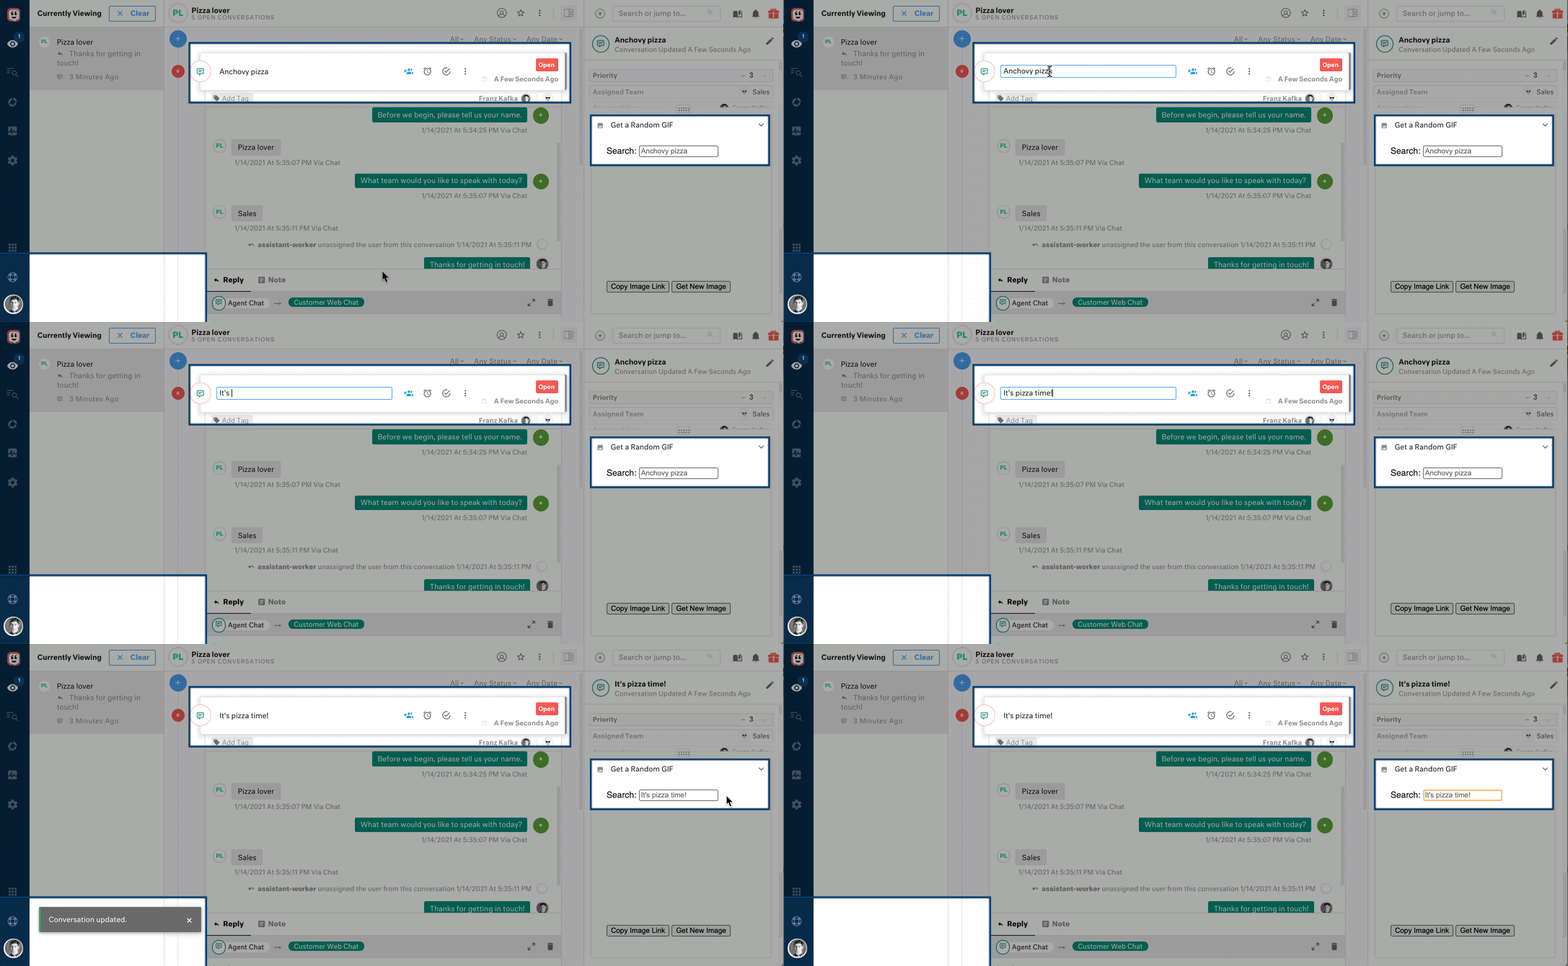
The search term updates to match saved changes to the conversation subject.
Step 4: Connect to an external API
The web page for the KView can now pull in data from Kustomer. The KView so far primarily operates within Kustomer. In this step, we'll update our app definition to integrate and connect the KView with an external service.
To integrate with an external service, we'll introduce three new concepts: App Settings, Internationalization, and Commands.
With App Settings you can define settings that allow input from users in Kustomer. App Settings require Internationalization strings for app settings keys.
With Commands you can define API calls that are proxied through Kustomer's servers. These commands can use app settings.
Update the app definition
First, we'll update the app definition in our app directory to define an app setting, internationalization for the app setting, and a command. We also need to update the version for the app to reflect the app definition changes.
In the updated app definition, we'll abstract out tutorialApp to use as a namespace to connect several pieces of our app. We'll also add or updated entries for the version, settings, i18n, and commands properties. The kviews property we defined earlier remains the same.
We've provided explanations for each updated entry below the code sample.
const tutorialApp = "giphy_tutorial_<organization>";
const siteURL = "https://your-site-url-goes.here";

export default {
  "app": tutorialApp,
  "version": "0.0.2",
  "title": "GIPHY App Tutorial",
  "settings": {
  	"default": {
    	"apiKey": {
  			"type": "secret",
        	"defaultValue": ""
      }
    }
  },
  "i18n": {
    "en_us": {
      [tutorialApp +".settings.page.title"]: "GIPHY App Tutorial",
      [tutorialApp +".settings.page.description"]: "Configure settings for GIPHY",
      [tutorialApp +".settings.path.default.apiKey.description"]: "GIPHY API key",
      [tutorialApp +".settings.path.default.apiKey.displayName"]: "API Key"
    }
  },
  "commands": [{
    "name": tutorialApp +".app.randomgiphy",
    "displayName": "Fetch a random GIF",
    "type": "external-api",
    "url": "https://api.giphy.com/v1/gifs/random?api_key={{apiKey}}&tag={{tag}}&rating=g",
    "httpMethod": "get",
    "appSettings": {
      "apiKey": {
          "key": tutorialApp + ".default.apiKey"
      }
    },
    "inputSchema": {},
    "permittedUrlArgs": ["tag"]
  }],
  "kviews": [{
     "name": tutorialApp + ".randomgiphy",
     "template": `<div>
        <DynamicCard
          src="${siteURL}"
          fillToWidth
          noPadding
          context={context.conversation}
        />
      </div>
      `,
     "context": "smartbar-card",
     "resource": "conversation",
     "meta": {
       "displayName": "Get a Random GIF",
       "icon": "image"
     }
  }]
};
Version
Update the version property to a new version. To learn more, see Register or update an app with commands.
Example: "version": "0.0.2"
App Settings
For our App Settings definition, we'll specify a new "secret" field named apiKey. Secret fields save securely and end user are unable to view secret fields after the field saves. Only commands and workflow actions can use secret fields.
i18n
For our Internationalization (i18n) definition, we'll specify the text for the settings page the Kustomer apps platform auto-generates for the apiKey setting. While we'll define internationalization strings just for English in this tutorial, you can add strings for the languages you support with your app. The apps platform uses en_us as the default fallback language locale for undefined languages, so always define at least en_us strings as a best practice.
Commands
For our Commands definition, we'll specify a single command, "Fetch a Random Gif," that make a request to the GIPHY API and retrieve a random GIF using the apiKey provided by the user and a search param provided when the command runs. This API endpoint returns a set of URLs of the randomly chosen GIF at different sizes to use.
Update the app version
Save the updated app definition and run npm run register-new-version giphy_tutorial_<organization> to register the new version (in this case, 0.0.2) of the tutorial app.
If the npm command runs successfully, you will see a response and JSON body similar to the example below returned in the terminal.
The returned JSON body shows the updated app version, the namespaced version of your app name appended with your orgId, and other app data.
> [email protected] register-new-version
> node ./_scripts/register-new-version "giphy_tutorial_<organization>"

{
  data: {
    type: 'available_app',
    id: 'giphy_tutorial_<organization>_<orgId>-0.0.2',
    attributes: {
      name: 'giphy_tutorial_<organization>_<orgId>',
      auth: {},
      version: '0.0.2',
      ...
      clientId: '<Client ID>'
    },
    relationships: {...},
    links: {...}
  }
}
Upgrade your app in Kustomer
After you update the app version, you will need to upgrade the installed tutorial app in the App Directory for your Kustomer organization.
Go to Settings > Apps > App Directory, and select the Attention Required section under the Installed tab. If you don't see the GIPHY App Tutorial app, try refreshing your browser to load any new versions.
Upgrade your GIPHY App Tutorial app to the new version.
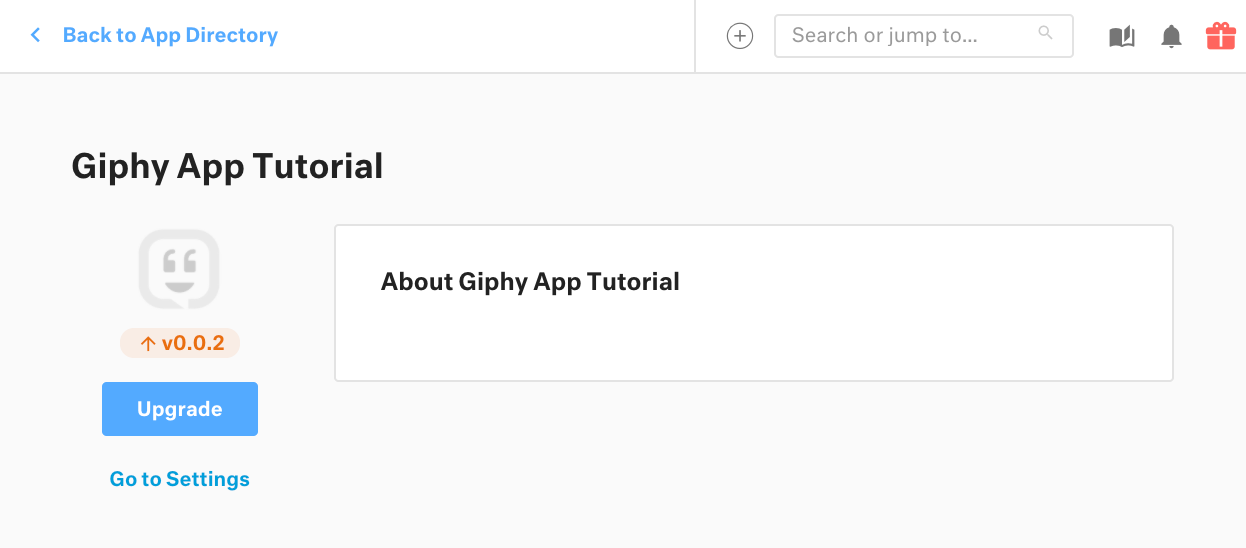
Upgrade your tutorial app to the new version.
After you upgrade your app from Kustomer App Directory, select Go to Settings to access the settings page. You can also go to Settings > Apps > GIPHY App Tutorial to view the app settings page for the tutorial app.
On the settings page, enter your GIPHY API key, and select Save Changes. Refresh your browser to view the changes.
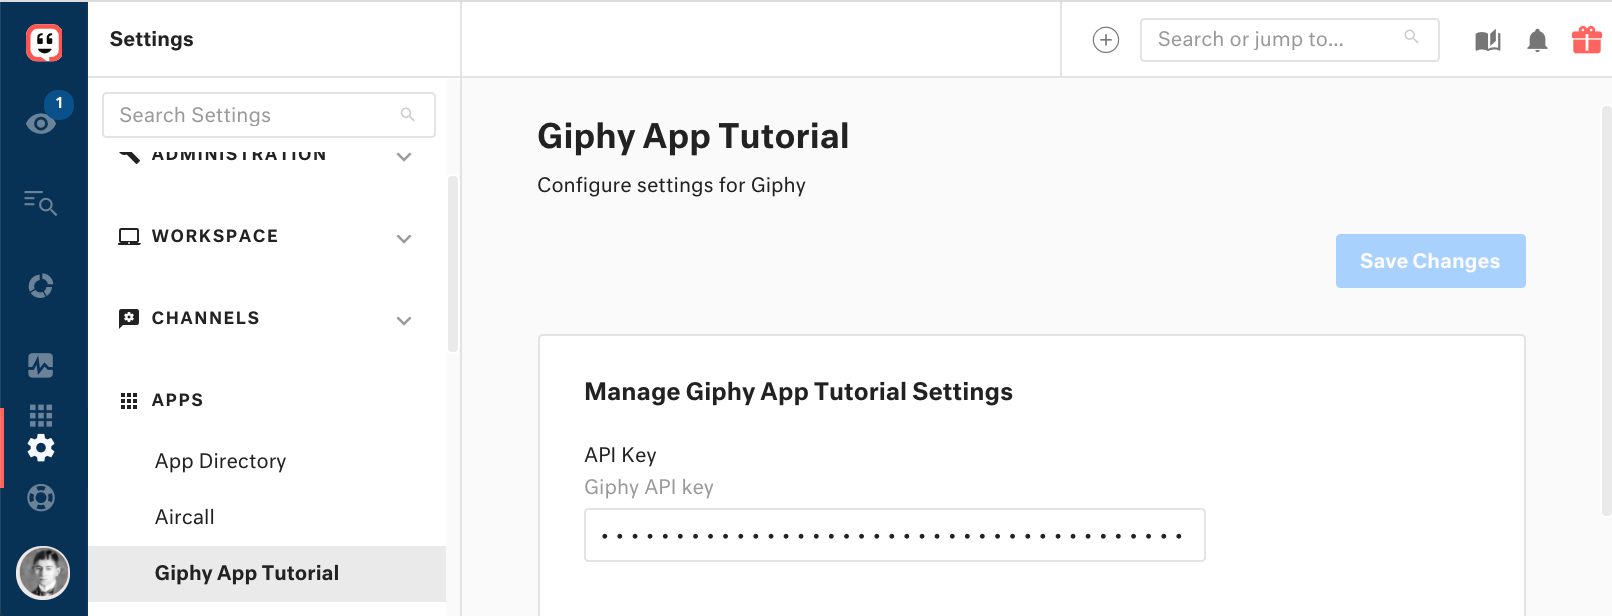
Enter the GIPHY API key in the app settings page.
Update your web page to use the command
After we configure the GIPHY API key for the tutorial app in the Kustomer, we'll update the script.js file for our web page to use the command we defined earlier to pull in a random GIF.
In the expanded JavaScript, we'll add two new methods: updateImage and getRandomImages.
updateImageselects and renders an image that fits into the available 200x200 space available for the KView.getRandomImagesuses the Cards SDK methodKustomer.command.run()to run the command we defined in the tutorial and to retrieve the set of image URLs.
When you call getRandomImages, replace <organization> and <orgId> with your organization name and orgId to enter a the namespaced version for the name property of the command you defined earlier.
Example: "giphy_tutorial_<organization>_<orgId>.app.randomgiphy"
let subject, currentImages;

const getRandomImages = async tag => {
  const result = await Kustomer.command.run(
    "giphy_tutorial_<organization>_<orgId>.app.randomgiphy",
    {
      urlArgs: { tag }
    }
  );
  return result?.responseBody?.data.images;
};

const updateImage = async () => {
  currentImages = await getRandomImages(subject);
  const img = document.createElement("img");
  const image =
    +currentImages.fixed_width.height < 200
      ? currentImages.fixed_width
      : currentImages.fixed_height;
  img.src = image.url;
  const container = document.getElementById("imgContainer");
  container.replaceChildren(img);
};

const updateSubjectFromConversation = conversation => {
  subject = conversation.attributes.name;
  const searchElement = document.getElementById("search");
  searchElement.placeholder = subject;
};

Kustomer.initialize(conversation => {
  updateSubjectFromConversation(conversation);
  updateImage();
  Kustomer.on("context", updateSubjectFromConversation);
});
Check your progress
Once again, we don't need to update our app version because we are only changing the web page. Once you update the web page, those changes are reflected in the "Get a Random GIF" KView.
Try the updated KView and command
Open and close the KView or refresh your browser to view the changes in Kustomer.
Take a moment to test out the updated KView in your timeline. When you open a Conversation object in the timeline, you should now see a random GIF displayed based on the subject of the opened conversation.
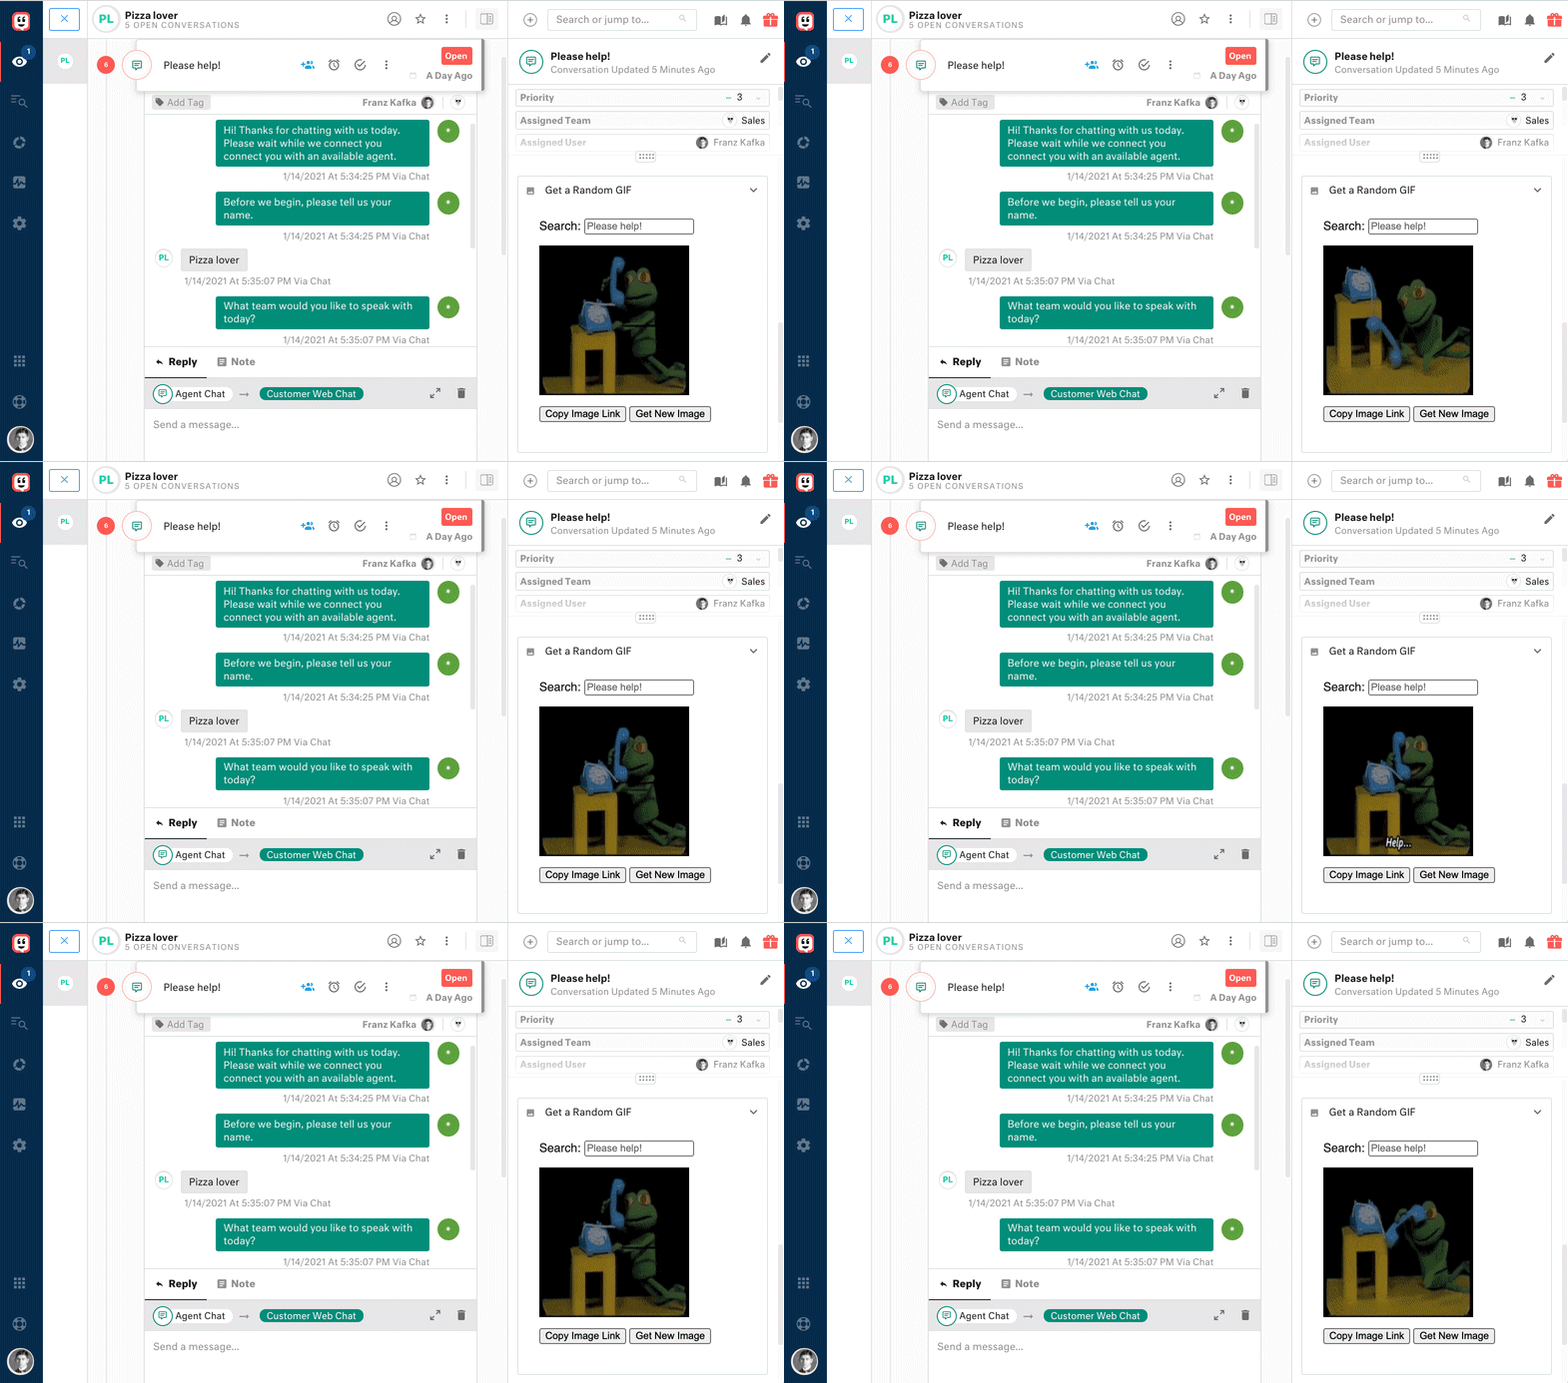
The KView now displays a random GIF based on the subject of the selected conversation.
Step 5: Complete the app
As a final step, we'll connect the different parts of the interface.
To complete the app, we'll need do the following in the script.js file for the web page:
-
Update the
updateImagemethod to pass a dynamic value through the command we defined in Step 4. This allows us to use ourcommandsparameters to make a different search query if the user enters another search term in the search box. -
Use the JavaScript Clipboard API to copy the original version of the GIF for users to attach the GIF to a conversation with the Add Image option in the Conversation view.

Add Image option in the Conversation view.
let currentImages, subject;

const copyImage = () => {
  navigator.clipboard.writeText(currentImages.original.url);
}


const getRandomImageList = async tag =>  {
  const result = await Kustomer.command.run('giphy_tutorial_<organization>_<orgId>.app.randomgiphy', {
    urlArgs: {tag}
  });
  return result?.responseBody?.data.images;
};

const getSearchValue = () => {
  return document.getElementById('search').value;
}

const updateImage = async () => {
  currentImages = await getRandomImageList(getSearchValue() || subject);
  const img = document.createElement("img");
  const image = +currentImages.fixed_width.height < 200 ? currentImages.fixed_width : currentImages.fixed_height;
  img.src = image.url;
  const container = document.getElementById("imgContainer");
  container.replaceChildren(img);
};

const updateSubjectFromConversation = conversation => {
  subject = conversation.attributes.name;
  const searchElement = document.getElementById('search');
  if (searchElement.placeholder !== subject) {
    searchElement.placeholder = subject;
    if (!getSearchValue()) {
      updateImage();
    }
  }
};

Kustomer.initialize((conversation) => {
  updateSubjectFromConversation(conversation);
  updateImage();
  document.getElementById('newImage').addEventListener('click', updateImage)
  document.getElementById('copy').addEventListener('click', copyImage)
  document.getElementById('search').addEventListener('change', updateImage);
  Kustomer.on('context', updateSubjectFromConversation)
});
Check your progress
You can now select Get New Image to request new GIFs for the existing search term or enter a new search term. When you find the perfect GIF, you can copy the image link and add it to your conversation as an image.
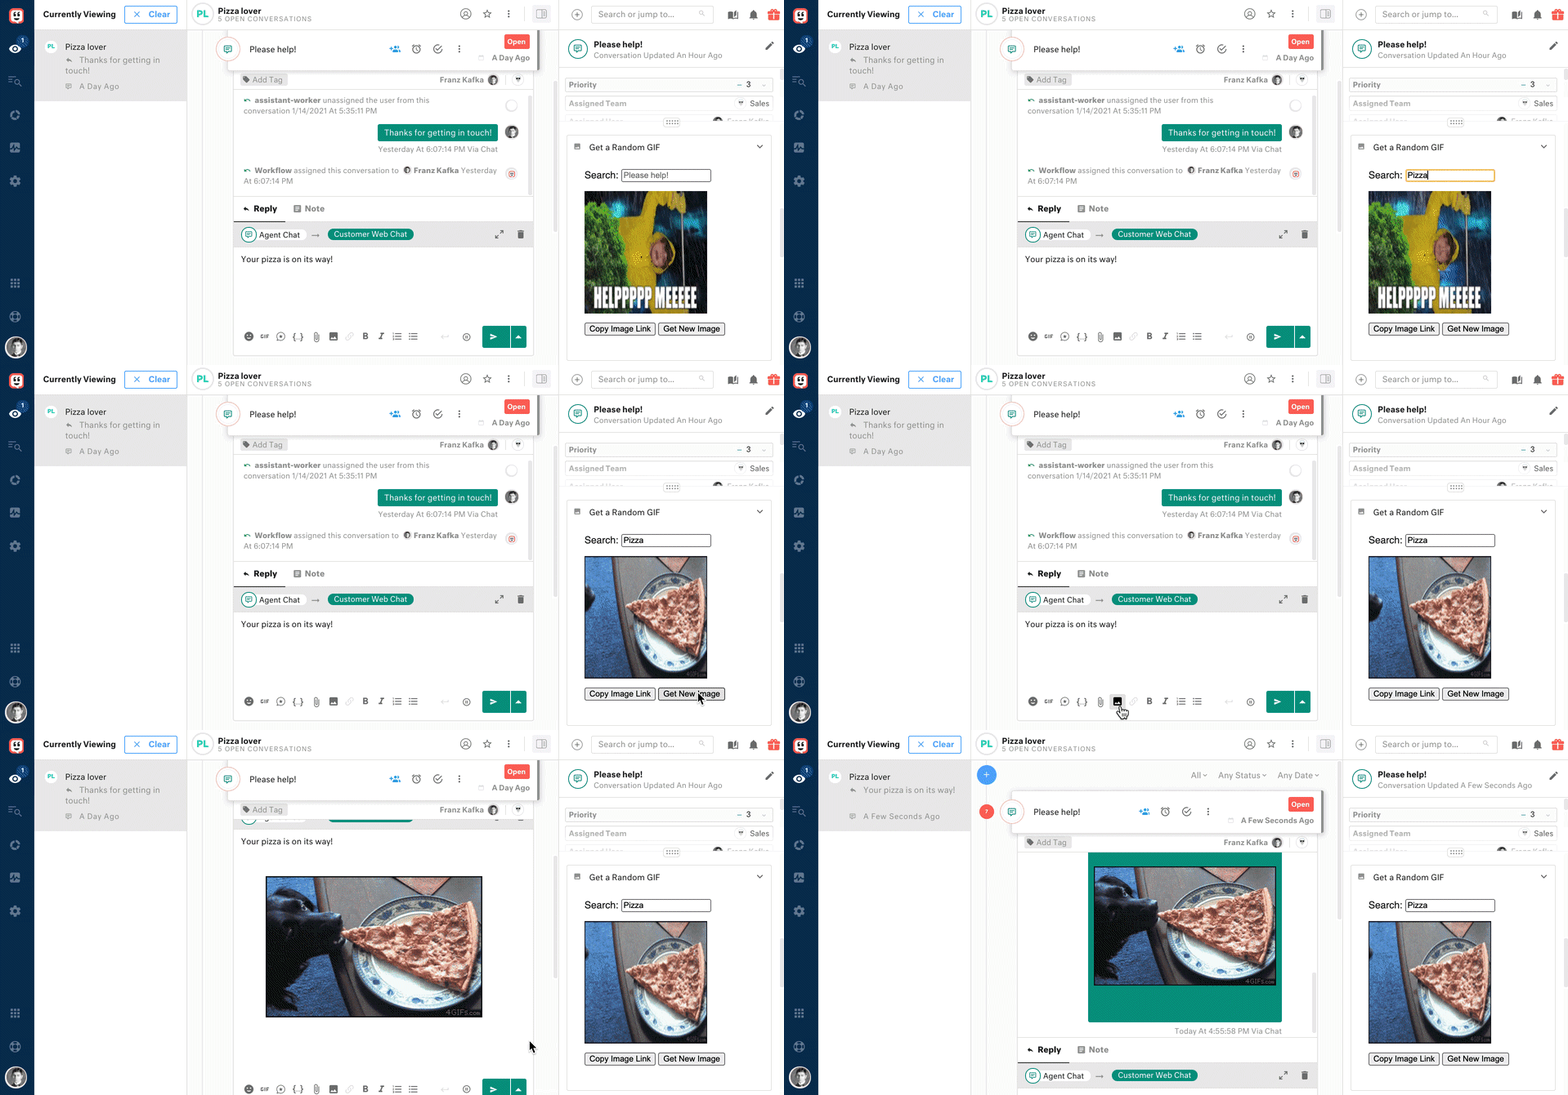
Get new GIFs, search for new GIFs, and copy image links to use in conversation replies.
Tutorial wrap up
And that's a wrap. Congratulations on creating your own GIPHY app!
Here's what we learned how to do in this tutorial:
-
How to use the Cards SDK and Klass Views to build a rich UI in Kustomer.
-
How to use App Settings and Commands to make authenticated calls to an external service.
-
How to build, register, and update an app with the Kustomer App Starter Config repo.
Congrats on completing the tutorial!
Updated over 4 years ago